


Thanks to the speed of USB 3.1 and Thunderbolt 3 connections, it’s now possible for an external hard drive to match the read and write speeds of an internal drive. Combine that with a proliferation of external SSDs, and for the first time, running Windows off an external drive is viable.
There are a few reasons you might want to do that:
- You have a work laptop that you’re not allowed to make many changes to, but you want to take games or other non-work sanctioned software with you when you travel.
- You want to run multiple operating system installations on the same machine, but don’t have enough space to split your internal drive into multiple partitions.
- You’re running an enterprise version of Windows that comes with the Windows To Go feature, and have a certified installation drive, so you can create a portable installation that will work on any computer.
Before we start, let’s get the bad news out of the way: Windows will refuse to install on an external drive if it knows that’s what you’re doing. But there are a few ways around this, including emulation via tools like VMWare. The easiest workaround is an application called WinToUSB.
Follow these steps to get Windows running on your external drive.
Download WinToUSB
WinToUSB serves the same function as Windows To Go, an enterprise-only tool from Microsoft that doesn’t work with most consumer versions of Windows. It’s intended for use with USB sticks, but it will work for other external drives too.
Prepare your Windows installation image
If you already have a DVD, an image file, or an installation USB stick for Windows, you’re set on this one. If not, it’s easy to download a Windows 10 installer ISO image file directly from Microsoft. Just make sure you pick the image for the edition and language of Windows for which you own a license.
If you’re just cloning your current Windows installation, you don’t actually need this, so skip this step.
Tell WinToUSB where Windows is
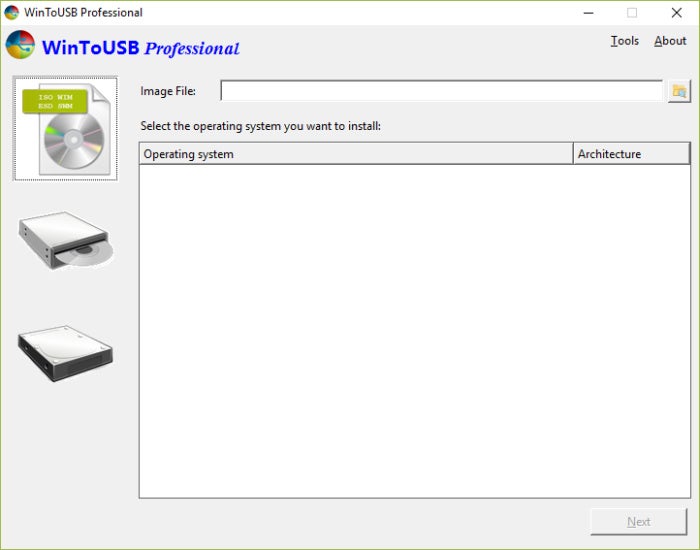 |
| Add caption |
The icons along the left of WinToUSB let you choose the media from which to install Windows: an image file, DVD, or clone of the current system installation. Pick the one that applies.
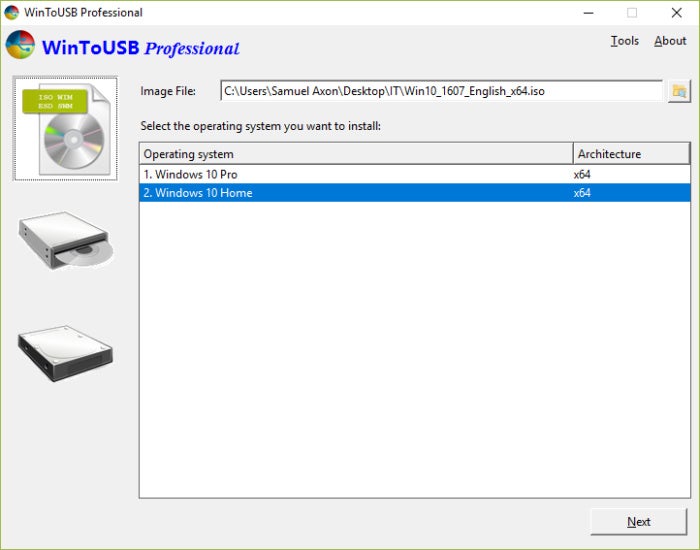
Once you’ve done that, you may see some options under the Operating system column in the main window. Pick the one that matches the license you have. For example, if you’re installing from the official image file, you’ll be able to choose between Home and Pro.
Click Next.
Select the installation disk, partition, and mode
On the next screen, use the drop-down labeled Please select the destination disk: at the top to pick the external drive you want to install Windows to. Make sure it’s plugged into your computer, of course!
This will open up a bunch of options below that. You’ll be asked to pick the system and boot partitions, and this will usually be straightforward. If the external drive isn’t split into multiple partitions, you can easily just pick the available partition for both system and boot.
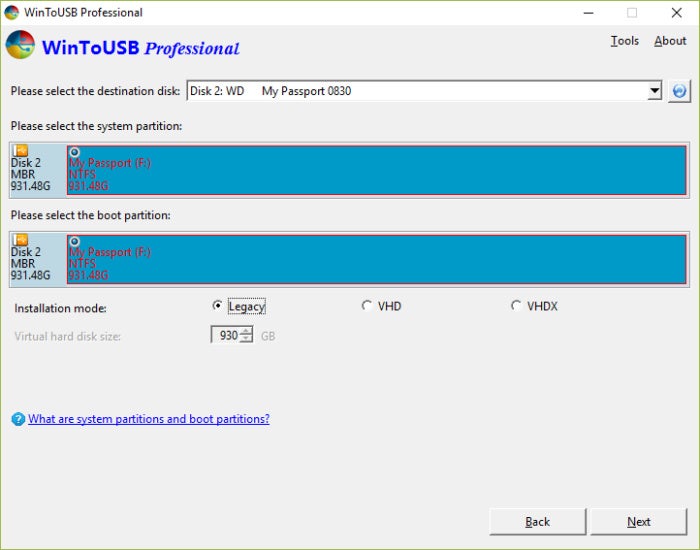
Finally, you’ll be presented with Installation mode. If you can, pick Legacy mode; that’s the simplest way to go. Only try installing Windows in VHD mode if you have issues installing Legacy. You’ll also be given the option to configure the size of the Windows installation on the drive; just go with the max available unless you’re doing something special.
Click Next to get the installation started. You’ll see a progress percentage. The time it takes to install will depend on a number of factors, such as the speed of the destination drive. It could be 15 minutes, or it could be a couple of hours. You’ll be prompted when it’s done.
Boot into Windows
After the WinToGo process is complete, all you have to do is boot into Windows! To do this, restart your computer and boot from the external drive.
Unfortunately, the method for selecting which disk to boot from after restart varies among computers. Often, you just have to press F12 while the PC is booting to access the BIOS, where you will make this change. Barring that, pay attention to the motherboard-maker screen that appears when your PC boots (prior to loading the OS)—it will flash instructions for accessing the BIOS.
You should be presented with a selection of drives to boot from. Pick the external drive (it’s usually labeled “EFI Boot” by WinToGo, if that helps). Windows installation should complete with a simple wizard from there.
Of course, you may have to download drivers and the like—the usual extras that come with a new Windows installation. But after a little legwork, you will have a fully functional installation of Windows on your external hard drive.
This story, "How to install Windows on an external drive" was originally published by PC World & Network World
Hey My Readers and Visitirs If You Like Us or Our Web Site Please Share and Link back To My Site ... Take Care .,.,.


.png)
0 comments:
Post a Comment