Social Icons

twitter facebook google plus linkedin rss feed email


Tuesday, December 19, 2017

AIM is officially dead


Say “goodbye” (in the AOL voice, if possible) to Aol Instant Messenger.
Back in October, Oath (the combined entity of Yahoo and Aol) announced that it would shutter AIM on December 15. Yes, today is the day.
While there is no shortage of means to communicate online, AIM holds a special place in many of our hearts.
For some of us, it was the first place we talked to our crush. It was our internet playground, where we grew accustomed to online acronyms and first learned about the very healthy habit of internet stalking.
AIM is the first place we ever wrote a web bio, likely in Comic Sans, with outrageous text and background colors.
AIM never stood a chance at keeping up with the pace of innovation on the web, which is why its sun has set, but that doesn’t change what it meant to us.
So today, pour one out for teenage you typing furiously on the computer in your parents’ office. LOL. AFK. BRB. ROFL.
Creaky door closing sound effect

Hey My Readers and Visitirs If You Like Us or Our Web Site Please Share and Link back To My Site ... Take Care .,.,.


Sunday, December 17, 2017

Apple Maps gets indoor mapping for more than 30 airports


As of this morning, Apple Maps has expanded to include indoor layouts of 30 airports across the globe. The company has primarily hit American cities thus far, covering what looks to be most of the big cities across the contiguous U.S. There are some key international airports, as well, including Hong Kong International, Amsterdam, Geneva, two in London and Berlin and a handful of Canadian locations.
It’s a big rollout, all in one fell swoop, that appears to have taken quite some time in the making. Each location requires close cooperation with airlines and the airports themselves, along with in-person surveyors. People have been recording the data in-person — sort of a human stand-in for those street mapping cars that Apple and Google deploy to get a lay of the land.
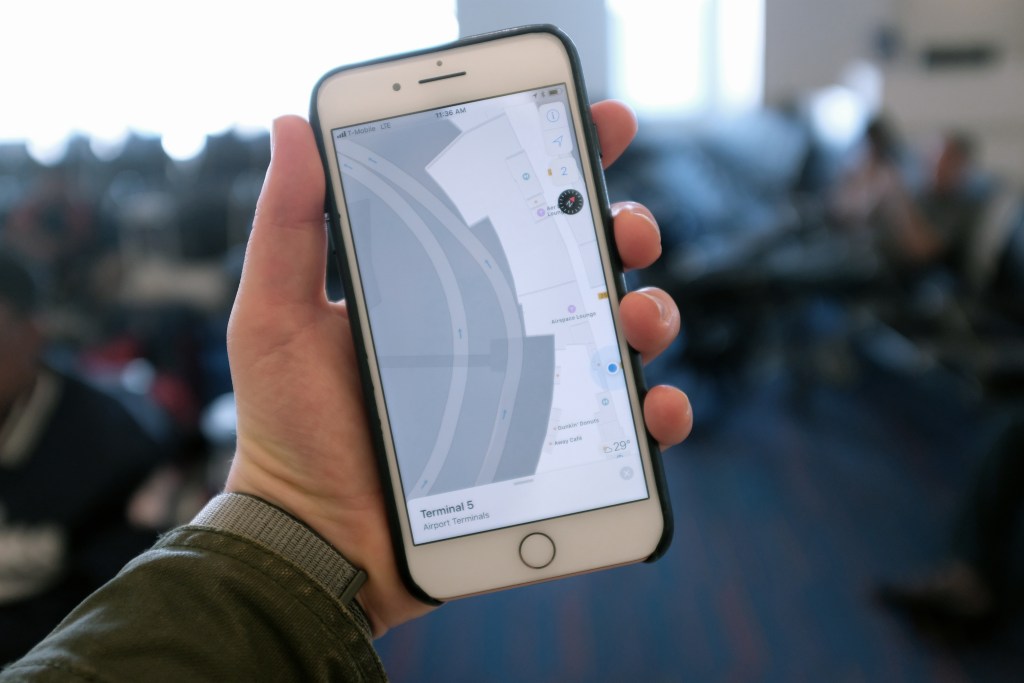
If an airport is included in the list, it will now sport the words “Look Inside” on the map. Tapping that will pop up a bird’s-eye view layout of the inside of the terminal. It’s that standard mapping grid view — in spite of sending human surveyors to collect data, there’s nothing here akin to Satellite or Street View. Not that most airport terminals are really all that much to look at in the first place.
The grid view highlights each gate in yellow, with a few key destinations populating the map — things like check-ins, baggage and airport lounges. Drilling down from there reveals other spots in more detail, including restaurants, restrooms and the like. Tap on a restaurant, for instance, and you’ll get a tab with data just like you would outside the airport. It offers the terminal name and floor number, phone number, hours and reviews pulled from a third-party review platform like Yelp.
Tapping on the number in the upper-right corner toggles between terminal levels. Swiping up with two fingers, meanwhile, offers up a 3D view of the space, with added depth. This lay of the land was gathered using CAD files provided to Apple by the individual airports, to give the user a better sense of place while wandering around the terminal.
We had the opportunity to test the new feature at JFK’s Terminal 5 earlier today, which was like going through all of the travel rigmarole without actually getting to go anywhere. I will say, however, that I was pleasantly surprised at how good a job the system does triangulate a phone indoors. The location accuracy is within a couple of meters, which is impressive inside, where GPS data is a crapshoot, at best.
Apple accomplishes this by using Wi-Fi points throughout the terminal. That triangulation is equally accurate whether or not you’re on the Wi-Fi — which I suspect many travelers aren’t, given the number of airports that still charge for access.
It should prove a handy feature for those planning out an hour or two in the airport — time I tend to spend wandering down terminal halls in search of slightly less terrible food options. There’s still a lot of room for potential growth here, too. After all, Apple has started incorporating flight data into other pieces of iOS so this would be a no-brainer.
Being able to see which gate a flight is leaving from directly inside the map app could be supremely useful. Ditto for figuring out which carousel your luggage is on. No word on when that information is coming — that after all, is a pretty unwieldy additional stream of data layer to add in.
Meantime, you can find the full list of participating airports on Apple’s site

Hey My Readers and Visitirs If You Like Us or Our Web Site Please Share and Link back To My Site ... Take Care .,.,.


Friday, December 15, 2017

How To Save Scanned Documents And Pictures As PDF In Windows 10


Want to scan a document and save it as a PDF file on Windows 10? Don’t want to use third-party programs to save scanned pictures or documents as PDF? In this guide, we will see how to automatically save scanned files as PDF with ease.
As with the case of its predecessors, Windows 10 also has a built-in Fax and Scan program using which one can use scan files by connecting Windows 10 PC to a scanner.
save scanned documents and pictures as PDF in Windows 10
The built-in Windows Fax and Scan program is a legacy desktop program but does its job well. The only problem with Windows Fax and Scan is that it cannot save scanned files in PDF or portable document format default. But there is a workaround to save files as PDF after scanning documents and pictures using Windows Fax and Scan program.
Additionally, you can also use new Windows Scan app from Microsoft to automatically save scanned documents and pictures as PDF. In addition to PDF, the Windows Scan app enables you to save scanned files in JPEG, PNG, TIFF, Bitmap, OpenXPS, and XPS formats.
In this guide, we will see how to use Windows Fax and Scan and Windows Scan to save scanned documents and pictures as PDF.
Method 2 of 2
Save scanned files as PDF using Windows Fax & Scan
Step 1: Open Windows Fax and Scan program. Click New Scan button in the toolbar.
save scanned documents and pictures as PDF in Windows 10 pic01
Step 2: View or select a different scanner by clicking Change button in the Scanner section.
save scanned documents and pictures as PDF in Windows 10 pic02
Step 3: In the Profile section, select the type of the file that you are going to scan as either Photo or Documents. Change other default settings, if you want.
Step 4: Click the Scan button to begin scanning the hard copy in the scanner.
Step 5: Once the scanning is completed, click the File menu and then click Print option. Yes, we are going to save the file as PDF.
save scanned documents and pictures as PDF in Windows 10 pic03
Step 5: When the Print dialog, select Microsoft Print to PDF from the printer drop-down box, and then click Print button.
save scanned documents and pictures as PDF in Windows 10 pic04
Step 6: At the Save Print Output As dialog, enter a name for your scanned file, select a location to save the file, and then click Save button to save it as PDF file. That’s it!
save scanned documents and pictures as PDF in Windows 10 pic05
Method 2 of 2
Save scanned files as PDF using Windows Scan
Here is how to use Windows Scan app to save scanned files in PDF in Windows 10.
Step 1: Check if Windows Scan app is already installed on your Windows 10 PC. If not, visit Windows Scan page in your web browser to automatically open the page in Windows Store app. Install the app.
save scanned documents and pictures as PDF in Windows 10 pic1.1
Step 2: Turn on the scanner, if not already done.
Step 3: Open Windows Scan app. Note that Windows Scan, and Windows Fax and Scan are two different apps. You need to open Windows Scan app.
Step 4: The Windows Scan app should automatically detect your scanner. If two or more scanners are found, please select the one that you would like to use now.
Step 5: In the left-pane, just below the scanner now, you can see the file type box. Select PDF option.
save scanned documents and pictures as PDF in Windows 10 pic2
Step 6: Finally, click the Scan button to begin scanning the paper in the scanner. Note that you can also preview before scanning by clicking the Preview icon.
save scanned documents and pictures as PDF in Windows 10 pic3
It will also display a small banner once the scanning is completed with an option to View the scanned file.
The Windows Scan app will automatically save the scanned PDF file in Pictures in the following location by default:
C:\Users\YourUserName\Pictures\Scans
save scanned documents and pictures as PDF in Windows 10 pic4
Hope you find this guide helpful!
Sources: intowindows

Hey My Readers and Visitirs If You Like Us or Our Web Site Please Share and Link back To My Site ... Take Care .,.,.


Thursday, December 14, 2017

Reset or Repair Microsoft Edge Web Browser in Windows 10


If you are using the built-in and default "Microsoft Edge" web browser in Windows 10 operating system, this tutorial might be useful for you.
Sometimes you may feel that the Microsoft Edge web browser is not working properly. Its slow, sluggish, not opening some web pages, throwing random error messages, crashing, etc. Or you may want to restore all the settings of Microsoft Edge to default for a fresh start.
When a software program is not working properly, repairing it or resetting it to factory settings is the best solution and that's why Microsoft has implemented a new feature in Windows 10 newer versions to repair or reset Microsoft Edge web browser. Although it's a little bit hidden and not easily accessible for everyone.
Now if you are facing any problem or issue with Microsoft Edge web browser in Windows 10, you can repair it. If repairing doesn't help, you can reset it to factory settings for a fresh start.
There is a difference in repairing and resetting Microsoft Edge browser. If you select the Repair option, it'll repair the files and registry keys related to Microsoft Edge. It'll not affect your user data such as customized settings, browsing history, cache, cookies, etc. But if you select the Reset option, it'll delete your customized settings, browsing history, cache, cookies, etc. Although your favorites will be saved.
You can repair or reset Microsoft Edge using Settings app as mentioned in following steps:
1. Open Start Menu and click on Settings option. It'll open Settings app. Alternatively, you can directly open Settings app using WIN+I hotkey.
2. Now click on "Apps" icon and in left-side pane, keep the "Apps & Features" link selected.
PS: Alternatively, You can directly launch the "Apps & Features" page using "ms-settings:appsfeatures" command in the RUN dialog box as mentioned here.
3. Now scroll down a little and click on "Microsoft Edge" program entry. You'll see "Advanced options" link along with "Move" and "Uninstall" buttons.
https://media.askvg.com/articles/images6/Microsoft_Edge_Advanced_Options_Settings.png
4. Click on "Advanced options" link and it'll open a new page. Here you can repair or reset Microsoft Edge web browser by clicking on "Repair" or "Reset" buttons.
https://media.askvg.com/articles/images6/Repair_Reset_Microsoft_Edge_Windows_10.png
First you should try the repair option. It should fix issues related to Microsoft Edge web browser. It it doesn't work, then you should try the reset option.
Sources: askvg

Hey My Readers and Visitirs If You Like Us or Our Web Site Please Share and Link back To My Site ... Take Care .,.,.


Tuesday, December 12, 2017

FREE Assassin's Creed Black Flag PC Game till December 18


The Ubisoft Club is offering a  Download (Reg. $19.99) — no purchase required! It's free to download for a limited time then it is yours to keep! Just click here  then register or log into your Uplay account to download the game today. Offer ends 4:00 AM ET on December 183, 2017.
About Assassin's Creed Black Flag
The lawless Caribbean, 1715, discover the fullest Assassins Creed world ever created. Stand among legendary pirates such as Blackbeard and Calico Jack and relive the truly explosive events that defined the Golden Age of Pirates.

Hey My Readers and Visitirs If You Like Us or Our Web Site Please Share and Link back To My Site ... Take Care .,.,.


Check The Data Usage For Individual Networks In Windows 10


Data usage monitor is a new feature introduced with Windows 10 to help PC users monitor their internet connection data usage. The data usage counter shows the data consumed by your PC over the past 30 days.
In Windows 10, you can navigate to Settings > Network & Internet > Data usage to view the data consumed by your PC over the past 30 days. You can even view the data usage by apps.
Before the Fall Creators Update for Windows 10, resetting the data usage counter was not easy. We had to delete few system files to reset the data counter. But with Windows 10 Fall Creators Update, Microsoft introduced a reset button to quickly reset the data usage counter.
In the recently released Windows 10 RS4 build, Microsoft has further improved the data usage counter. You can now check the data usage for individual networks.
As you likely know, the data usage counter would earlier show data usage over different connections (if you connected to). If you had connected your PC to multiple Wi-Fi networks, the data usage counter would show only the collective data usage for all these Wi-Fi networks.
That is, there was no way to check the data usage when your PC was connected to a particular Wi-Fi connection. In other words, there was no option to view the data usage for individual networks.
In Windows 10 RS4 build 17046 and above builds, the data usage monitor or counter displays the data consumed by your PC over the past 30 days when it was connected to the Wi-Fi network that your PC is currently connected to. For instance, if you are currently connected to the internet via your Wi-Fi at home, Windows 10 will show the data usage for your home Wi-Fi for the past 30 days.
Check data usage for a specific network in Windows 10
Here is how to check data usage for individual networks in Windows 10.
IMPORTANT: Works in RS4 build 17046 and above builds only.
Step 1: Open the Settings app. Navigate to Network & Internet > Data usage.
Step 2: In the Data usage section, you can see the data used by your PC from the network that your PC is currently connected to. The data usage section shows data usage for the past 30 days. As you can see in the picture below, the data usage counter is showing the data usage by my PC from the Office Wi-Fi over the past 30 days.
check data usage for specific networks in Windows 10 pic1
Note that you cannot view the data usage for a Wi-Fi network unless you connect your PC to that network.
When you at the Data usage page, click the View usage per app link to view the data usage details per app. Again, if you want to check the data usage by apps for the current network, select your network from the Show usage from drop-down box.
check data usage for individual networks in Windows 10 pic1
As you know, you can reset the data usage at any time by clicking the Reset usage stats button.
Sources: intowindows

Hey My Readers and Visitirs If You Like Us or Our Web Site Please Share and Link back To My Site ... Take Care .,.,.


Friday, December 8, 2017

How To Trim Video Files In Windows 10 Using Photos App


Do you have a video file on your PC that you would like to trim before sharing with friends and family? Want to quickly trim a video file in Windows 10 without using third-party tools? In this guide, we will see how to trim video files in Windows 10 without installing additional software.
A good number of free utilities available to trim video files. But if you are on a recent build of Windows 10, you will be happy to know that you can trim video files using one of the built-in apps.
trim video files in Windows 10 using Photos app pic3
The Photos app in Windows 10 is not just the default picture viewer in Windows 10 but offers plenty of tools to edit photos and videos. We have already discussed adding slow-motion effect to video files using the Photos app. This time around, we will discuss how to use the Photos app to trim videos on your Windows 10 PC.
Since Photos app is a basic editing tool, you cannot use it to trim multiple portions of a video file at once. For instance, in a five-minute video file, you cannot trim the video from two to three minutes and then four to five minutes.
Trim video files using Photos app in Windows 10
Step 1: The first step is to open the video file that you want to trim down with the Photos app. To do that, simply right-click on the video file, click Open with, and then click Photos app to open the video with Photos app. If you cannot see the Photos option, click Choose another app option and then select Photos app.
trim video files in Windows 10 using Photos app pic1
If the Photos app fails to open, refer to the directions in our Photos app not opening in Windows 10 guide.
Step 2: Now that you have opened the video file with the Photos app, click Edit & Create, and then click Trim option.
trim video files in Windows 10 using Photos app pic2
If you cannot see the Edit & Create option, please click anywhere in the video file to see all options.
Step 3: Move the sliders to select the area that you want to keep. You can preview the video file after selecting the portion that you want to keep, before saving it.
trim video files in Windows 10 using Photos app pic3
Step 4: Finally, click Save a copy option to create a new video file by omitting the trimmed portion of the video. The new video file can be found at the location of the original video.
You can now play the video file in any video player.
Sources: intowindows

Hey My Readers and Visitirs If You Like Us or Our Web Site Please Share and Link back To My Site ... Take Care .,.,.


Thursday, December 7, 2017

Do you want a ‘highly secure’ Windows 10 PC? Here are the requirements.


Windows 10 is one of the most secure OS you can use, but even though Microsoft is constantly patching vulnerabilities and adding security features (e.g., Controlled folder access, Exploit protection, Windows Defender Application Guard) it’s still vulnerable to attacks if you don’t use the right combination of software and hardware.
On an effort to make Windows 10 (version 1709) more secure, Microsoft has published a set of standard requirements for a “highly secure Windows 10 device.”
These new Microsoft’s standards are recommended for “general purpose desktops, laptops, tablets, 2-in-1’s, mobile workstations, and desktops,” and outlines the processor, process architecture, virtualization, secure boot, firmware requirements, and even the new minimum amount of memory to ensure a secure experience running Windows 10.
In this guide, we’ll take a closer look at the hardware recommendations to have a “highly secure” computer running Windows 10.
HARDWARE
FeatureRequirementDetails
Processor generationSystems must be on the latest, certified silicon chip for the current release of WindowsIntel 7th generation Processors (Intel i3/i5/i7/i9-7x), Core M3-7xxx and Xeon E3-xxxx and current Intel Atom, Celeron and Pentium Processors.

AMD 7th generation processors (A Series Ax-9xxx, E-Series Ex-9xxx, FX-9xxx).
Process architectureSystems must have a processor that supports 64-bit instructionsVirtualization-based security (VBS) features require the Windows hypervisor, which is only supported on 64-bit IA processors, or ARM v8.2 CPUs
VirtualizationSystems must have a processor that supports Input-Output Memory Management Unit (IOMMU) device virtualization and all I/O devices must be protected by IOMMU/SMMU

Systems must also have virtual machine extensions with second level address translation (SLAT)

The presence of these hardware virtualization features must be unmasked and reported as supported by the system firmware, and these features must be available for the operating system to use.
For IOMMU, the system must have Intel VT-d, AMD-Vi, or ARM64 SMMUs

For SLAT, the system must have Intel Vt-x with Extended Page Tables (EPT), or AMD-v with Rapid Virtualization Indexing (RVI)
Trusted Platform Module (TPM)Systems must have a Trusted Platform Module (TPM), version 2.0, and meet the latest Microsoft requirements for the Trusted Computing Group(TCG) specificationIntel (PTT), AMD, or discrete TPM from Infineon, STMicroelectronics, Nuvoton
Platform boot verificationSystems must implement cryptographically verified platform bootIntel Boot Guard in Verified Boot mode, or AMD Hardware Verified Boot, or an OEM equivalent mode with similar functionality
RAMSystems must have 8 gigabytes or more of system RAM
Firmware
FeatureRequirementDetails
StandardSystems must have firmware that implements Unified Extension Firmware Interface (UEFI) version 2.4 or laterFor more information, see Unified Extensible Firmware Interface (UEFI) firmware requirements and Unified Extensible Firmware Interface Forum specifications
ClassSystems must have firmware that implements UEFI Class 2 or UEFI Class 3For more information, see Unified Extensible Firmware Interface Forum specifications
Code integrityAll drivers shipped inbox must be Hypervisor-based Code Integrity (HVCI) compliantFor more information, see the Enable virtualization-based isolation for Code Integrity section of Driver compatibility with Device Guard in Windows 10
Secure bootSystem's firmware must support UEFI Secure Boot and must have UEFI Secure Boot enabled by defaultFor more information, see UEFI firmware requirements and Secure Boot
Secure MORSystem's firmware must implement Secure MOR revision 2For more information, see Secure MOR implementation
Update mechanismSystems must support the Windows UEFI Firmware Capsule Update specificationFor more information, see Windows UEFI firmware update platform
As you can see, the main requirements are at least a seventh-generation 64-bit processor from Intel or AMD, a minimum of 8GB of memory, Trusted Platform Module (TPM), and a UEFI with secure boot enabled.
While Microsoft is aiming these technical specifications for manufacturers to build secure devices running the Windows 10 Fall Creators Update, it’s a great resource that would make it easier to decide which device to purchase, or which components to get if you like to build your computers from scratch.

Hey My Readers and Visitirs If You Like Us or Our Web Site Please Share and Link back To My Site ... Take Care .,.,.


add

Related Posts Plugin for WordPress, Blogger...
 

Google Analystic

add block