Social Icons

twitter facebook google plus linkedin rss feed email


Friday, August 24, 2018

Your Router’s Two IP Addresses


It’s an important part of understanding how information travels between your computer and the internet services you use.
It’s also important to know when asking questions and interpreting answers.

Your router’s primary job

Routers perform many different functions, but their primary role, at least in the home, is to act as a gateway to the internet.
You can think of your router as having two “sides”: one side is connected to the internet, and another to all of your computers and other devices. The router sits in-between, passing data traffic back and forth.
A Router's Role
The internet site is a connection provided by your ISP. All traffic to and from internet sites and services travel over this connection.
The “local” side, often referred to as a LAN, for Local Area Network, consists of all of the devices connected to the network at your home or place of business. Be it through a wired or wireless connection, these devices connect not to the internet, but to your router, through which the internet is made available.

The router’s two networks

These two networks — the internet on one side and your local network on the other — are completely separate. That data crosses between them is only due to the workings of your router, which is connected to both.
Two different networks imply two different IP addresses.
On the internet side, your router is typically assigned an IP address by your ISP when it boots up or first connects. This is your “true” internet address. You can see what yours is by using several online services, or by consulting my article, What’s My IP Address?
On the local side, your router is configured to use a specific IP address: often something like 192.168.1.1, 10.1.10.1, or something similar. You can see what yours is by running the command “IPCONFIG /ALL” in a Windows Command Prompt and looking for the Default Gateway address.
Default Gateway
The number using periods as the separator — it’s IPv4 address1 — is the IP address of your router.2
Router IP Addresses

Your router’s other job

Another job performed by your router is to manage the local network.
When the router connects to the internet, it requests an IP address, which is then provided by the ISP. This is your internet IP address. You very likely have only one of these, and it’s assigned to your router.
When your computer (or another device) connects to your local network, it also requests an IP address. This IP address is provided by your router. It looks a lot like the router’s own local IP address, though the last two numbers will be different. This is that computer’s local IP address. Each device connected to the local network has its own unique local IP address.
When a device on your local network wants to communicate with a device on the internet, it is the router’s job to “translate” between the two types of addresses. In fact, that’s what it’s called: Network Address Translation, or NAT. NAT makes it appear as if all of your devices (each with a unique local IP address) are coming from the same internet IP address — because they are. All the traffic going to and from the internet is handled by your router through its internet-side connection and IP address.

Determining the IP address

As we’ve seen above, there are two ways to see the two different IP addresses:
  • Using an online service (or page like my What’s My IP Address? article) will tell you the internet IP address of your router. When someone asks you for your IP address — say when trying to diagnose an issue you’re having in accessing a website — this is the number you provide.
  • Using the “ipconfig” command in a Windows Command Prompt will tell you the local IP address of that computer. In practice, you rarely need to know this one, except perhaps when diagnosing local network connectivity problems.

Specific IP addresses

One final note: a “local” IP address begins with either:
  • 10.x.x.x
  • 172.16.x.x through 172.31.x.x
  • 192.168.x.x
You will never see these addresses on the internet. They are called “non-routable” IP addresses and are reserved exclusively for local networks. That’s how, if you provide the wrong kind of IP address to your support person, they can tell immediately and ask you for “the other one.”

Hey My Readers and Visitirs If You Like Us or Our Web Site Please Share and Link back To My Site ... Take Care .,.,.


Thursday, August 23, 2018

Windows 10 Calculator App Keyboard Shortcuts


The current version of Windows 10 Calculator app is quite powerful and easily one of the best Calculate apps out there for Windows 10.
Since it offers many modes and options, most PC users use it regularly. If you also use the Calculator app very often, you might want to know the keyboard shortcuts available in the Calculator app to complete your calculations quickly.

Calculator app keyboard shortcuts in Windows 10

This article itemizes keyboard shortcuts for the Windows 10 Calculator app.
 Alt + 1 Switch to standard mode
 Alt + 2 Switch to scientific mode
 Alt + 3 Switch to programmer mode
 Alt + 4 Switch to date calculation mode
 Esc Clear all input (select C)
 Delete Clear current input (select CE)
 Ctrl + H Turn calculation history on or off
 Ctrl + M Store in memory
 Ctrl + P Add to memory
 Ctrl + Q Subtract from memory
 Ctrl + R Recall from memory
 Ctrl + L Clear memory
 Ctrl + Shift + D Clear history
 Up arrow Move up in history list
 Down arrow Move down in history list
 F9 Select ±
 R Select 1/X
 @ Calculate the square root
 % Select %
 F3 Select DEG in scientific mode
 F4 Select RAD
 F5 Select GRAD
  Ctrl + G Select 10x
 Ctrl + O Select cosh
 Ctrl + S Select sinh
 Ctrl + T Select tanh
 Shift + S Select sin-1
 Shift + O Select cos-1
 Shift + T Select tan-1
 Ctrl + Y Select y?x
 D Select mod
 L Select log
 M Select dms
 N Select In
 Ctrl + N Select ex
 O Select cos
 P Select Pi
 Q Select x2
 S Select sin
 T Select tan
 V Select F-E
 X Select Exp
 Y, ^ Select xy
 # Select x3
 ! Select n!
 % Select Mode
 F2 Select DWORD in programmer mode
 F3 Select WORD
 F4 Select BYTE
 F5 Select HEX
 F6 Select DEC
 F7 Select OCT
 F8 Select BIN
 F12 Select QWORD
 A-F Select A-F
 J Select RoL
 K Select RoR
 < Select Lsh
 > Select Rsh
 % Select Mod
 | Select Or
 ^ Select Xor
 ~ Select Not
 & Select And
 Spacebar Toggle the bit value

Hey My Readers and Visitirs If You Like Us or Our Web Site Please Share and Link back To My Site ... Take Care .,.,.


Google releases the newest version of Android

Every year it’s the same story:
  1. Google releases the newest version of Android
  2. Manufacturers then announce their support for the new version of Android
  3. Consumers wait 3-9 months for the new version of Android to hit their phones
While it looks like that general narrative will continue to play out this year, Huawei seems to be bucking the trend by announcing that its Android Pie update for the Huawei P20 Pro is scheduled to be released during IFA 2018. We technically don’t have an exact date for when Huawei will release the Android Pie update for the P20 Pro, but the new software build should surface sometime between August 31 and September 5.

The news was shared with MyBroadband by a spokesperson for Huawei in South Africa. Huawei’s Mate line was mentioned as well, but no specific date was given for its Android Pie update. Surprisingly, the Huawei P20 Lite was not mentioned, leaving us to believe that the cheaper version of Huawei’s 2018 flagship device isn’t selling as well as the P20 Pro and is thus not a high priority for the company.

It may be hard for some of you to get excited about Huawei’s Android Pie update plans. Huawei may not have a strong presence in North America, but the fact that the P20 Pro’s scheduled Android Pie update is only a few weeks out gives us hope that manufacturers are taking advantage of the Project Treble framework Google put in place last year which should reduce the amount of time needed to update smartphones to the latest version of Android.

After Huawei pushes out Android pie to the P20 Pro, which manufacturer do you think will be next to release Android Pie for one of their smartphones?

Hey My Readers and Visitirs If You Like Us or Our Web Site Please Share and Link back To My Site ... Take Care .,.,.


Wednesday, August 22, 2018

Windows 10 Mail App Keyboard Shortcuts


Mail app is one of the most used built-in apps in Windows 10. It offers almost everything that you would need to manage your email accounts.
If you have added one or more email accounts to the Mail and regularly use Windows 10 Mail app, you might want to know the keyboard shortcuts available in the Mail app to read, replay and forward email faster.
There are over 20 useful keyboard shortcuts in the Mail app. You can use the keyboard shortcuts compose a new email, add attachments, forward emails, send emails, and so much more.

Keyboard shortcuts for Windows 10 Mail app

Following are the useful keyboard shortcuts available in Windows 10 Mail app.
 Compose new email Ctrl + N or Ctrl + Shift + M
 Mark as read Ctrl + Q
 Mark as unread Ctrl + U
 Replay to currently open email Ctrl + R
 Replay to all Ctrl + Shift + R
 Forward currently open email Ctrl + F
 Search Ctrl + E or F3
 Switch to inbox Ctrl + Shift + I
 Switch to outbox Ctrl + Shift + O
 Add attachment Alt + I
 Send composed email Ctrl + Enter or Alt + S
 Zoom in Ctrl ++
 Zoom out Ctrl – –
 Manual sync Ctrl + M or F9
 Delete a conversation Ctrl + D or Del
 Archive a conversation Backspace
 Accepting meeting invitation Alt + C
 Decline meeting invitation Alt + D
 Tentative meeting invitation Al + N
 Move to view Ctrl + Shift + V
 Switch to Calendar Ctrl + 2
We will update this article if and when Microsoft adds new keyboard shortcuts to the Mail app.

Hey My Readers and Visitirs If You Like Us or Our Web Site Please Share and Link back To My Site ... Take Care .,.,.


Download Windows USB Troubleshooter For Windows 10


We all know that we should safely eject a USB drive before removing it from the computer. While safely ejecting a USB drive is fairly easy, sometimes, you might not be able to safely eject a USB device.
While trying to safely eject a USB device, you might get “This device is currently in use” error if one of the files located on the USB device is being used by a program.
Windows USB Troubleshooter
If you want to safely remove a USB drive/device that you are unable to do so, you can use the Windows USB Troubleshooter by Microsoft. The troubleshooter is designed to eject USB audio, storage and print devices that do not eject using the Safely Remove Hardware dialog box.
The Windows USB Troubleshooter can not only enable you safely eject external USB drives but also helps you safely remove other USB devices such as USB audio devices and printers.
This troubleshooter can also be used when Safely Remove Hardware and Eject Media doesn’t show your USB device.
In addition to Windows 10, Windows USB Troubleshooter is compatible with Windows 8 and Windows 7 as well.

Using Windows USB Troubleshooter on Windows 10

Complete the given below directions to safely eject a USB device using the official Windows USB Troubleshooter.
Step 1: Visit this page of Microsoft and click on the Download button to download Windows USB Troubleshooter.
Step 2: Run the troubleshooter. Click on the Next button.
Step 3: The troubleshooter will list connected USB audio and storage devices to your PC. Select the USB device that you want to eject safely.
Windows USB Troubleshooter pic1
Click Next button.
Step 4: In a few seconds, the troubleshooter will safely eject the selected USB device and will display the following dialog with “Fixed” message. You may click the close button now.
Sources: intowindows

Hey My Readers and Visitirs If You Like Us or Our Web Site Please Share and Link back To My Site ... Take Care .,.,.


USB Device Not Recognized? Here's How To Fix It

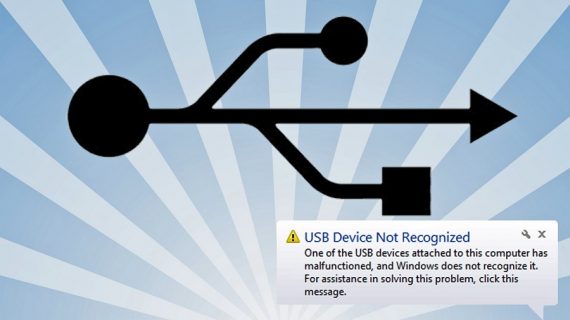
Being a Windows user for a long time, you must have faced the USB Device Not Recognized sometime in your life. Well, you are not alone as it is the most common problems encountered by many Windows users out there.

In the early days of computing, we highly relied on CDs or DVDs to transfer or sometimes even store data that’s portable. With time, however, the CDs and DVDs got replaced by USB flash drives or Pen Drives. This tiny USB stick or flash drive or pen drive, call it whatever, got an instant hit among the computer geeks as this device was quite useful in storing important data such as files or folders, movies, music, presentation slides etc.

People relied on these pen drives to carry their data wherever it’s required without the need to carry any heavy laptop or any other heavy equipment. All you need is a Windows PC with a working USB port and a simple plug and play will let you access the data from anywhere.

Although it seems a viable solution for data transfer, it also has its cons. The primary issue that most of us face while using the pen drive is the USB Device Not Recognized error. Every time you plug the pen drive into your desktop or laptop, you get a popup or notification stating, USB not recognized, which is quite frustrating and irritating as you need to access the data at that very moment.
USB Device Not Recognized - Fixing and Troubleshooting
Well, even though it is the most common and irritating problem, there are ways that you can try to get it resolved. Before we move on these different solutions, I must tell you that there’s no guarantee that the USB Device Not Recognized will be solved. These troubleshooting methods work most of the times. However, if the pen drive is corrupted, then there are chances that you may lose forever. Also, if the flash drive is under any virus attack, then you can always try and remove the malware to get it fixed.

Troubleshooting to Resolve USB Device Not Recognized Error

Patience is the key while facing errors such as USB not recognized as there’s no primary reason for the occurrence of this error. Most of the times, it’s just a technical glitch or compatibility issue and can be resolved with some quick basic troubleshooting, while sometimes you may have to try a few advanced methods.
So, if you are facing USB Device Not Recognized error on your Windows PC, whenever you plug in your Pen Drive, then follow these troubleshooting methods to resolve the issue.

Troubleshooting 1 – Shut Down And Unplug Your Computer

This is the simplest troubleshooting option whenever you pen drive is not detected on your Windows desktop or laptop. If this method works, then it can save a lot of time for you. Shut down your Windows PC and unplug the machine completely from the power supply. A mere restart is not enough. You need to shut down your PC and disconnect it from any power supply whatsoever.
Sometimes, even if you shut down or restart your PC, most modern computers don’t actually turn off. The motherboard can still get power until the power is completely taken out.
Remember, a motherboard is the heart of your PC and all the hardware including USB ports are connected to the machine via the motherboard. When the motherboard is rebooted, the small microprocessor on the motherboard will reload the drivers, including the drivers for USB devices, and it may start recognizing your pen drive when you plug it in.
Simply try and Shut Down your Windows PC, switch off the power and wait for 5-10 minutes. Then, switch on the power, and start your PC. Once the Windows is loaded completely, you can test your Pen Drive.

Troubleshooting 2 –Update the Driver

Another reason why your Windows PC is not able to recognize the USB device may be because of the missing or outdated drivers. Well, don’t worry about it. Simply go to the Device Manager panel on your Windows PC. If you are not aware of the term, then simply click “Start” and type devmgmt.msc. If that sounds too technical, then you can go to Control Panel and check for Device Manager.
If your Windows PC is not able to recognize your pen drive or any other USB Device, then you can find Unknown Device on the list of different devices on the Device Manager panel. Right-click on Unknown Device, click on Properties and then go to Driver tab. You will find an Update Driver button on the screen now. Click the button and wait for the driver to update.
You can also get a step ahead and try to download the driver for your devices directly from the manufacturer’s website. Well, if the USB device is a flash drive or a pen drive, then you don’t have to follow this step as it may not be a driver issue. However, for installing a USB printer, or any other USB device, you may have to download and install the necessary drivers for the particular device.

Troubleshooting 3 – Disconnect USB Device & Restart Your PC

If your Windows PC is still giving USB Device Not Recognized error, then you can try out this method. Disconnect any USB Device from your Windows machine, either desktop or laptop and restart your PC.

Once the machine is restarted, try to connect the troubling USB device again and check whether it is working now. Also, modern day PC is equipped with multiple USB ports. So, if one USB port does not recognize the device, try with other ports. There are chances that it is a particular USB port, which is causing the error. If none of the USB port is able to recognize the device, then there’s some other issue altogether.

Troubleshooting 4 – Power On/Off USB Ports

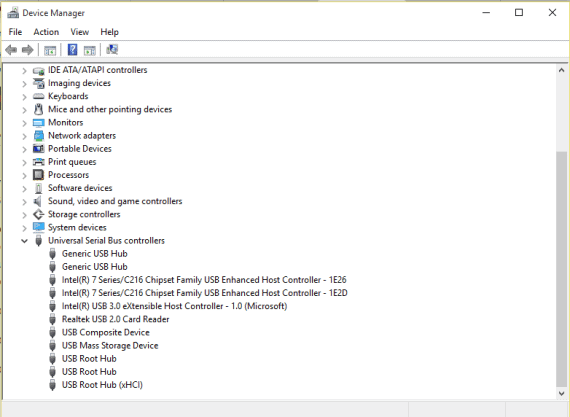
Next, best option is to switch on and off the power to your USB ports. You can do this easily from the Device Manager panel. Open the Device Manager window, find the Universal Serial Bus Controllers, and expand the section. Now, you will find either one or a list of different USB Root Hubs, Chipsets and other controllers under that section.
Device Manager - Universal Serial Bus Controllers
* Remember, you need to repeat the process for each USB Root Hub on the list.
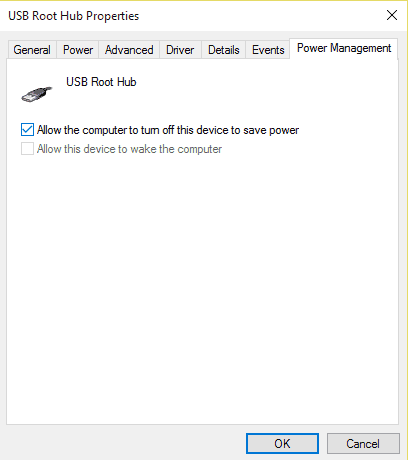
Right click on a USB Root Hub and click Properties.
Under the Properties window, you can find the Power Management tab. Go to the tab and uncheck Allow the computer to turn off this device to save power.
Device Manager - USB Root Hub Properties
Click OK and restart your PC. Once restarted, try connecting the USB device and check if it works. If it doesn’t, then repeat the process for each USB Root Hub again and this time, check the box that was unchecked before. Restart the device again and try connecting the USB device. Leave the box unchecked or checked on the basis of whether it works or not in either way.

Troubleshooting 5 – Always Try Connecting Directly to Your PC

Well, if you are getting the USB Device Not Recognized error when you are connecting the device using a USB hub or a similar gadget like that, then you must know that the problem could be the USB hub itself and not your USB device.
At such times, always try and connect the USB device directly to your PC and check if it works.

Troubleshooting 6 – Try Windows USB Troubleshooter

Well, if none of the above troubleshooting methods works, then you can always try the Windows USB Troubleshooter on your Windows PC. It's a free tool available online on the official Microsoft website but it works well only on past Windows versions such as Windows XP, Vista and 7.

Simply follow the instructions on the website and let the troubleshooter tool fix the problems automatically as doing it yourself can be too technical and confusing. The tool is designed to troubleshoot the USB problems in every possible way and it is quite effective to get rid of USB Device Not Recognized errors.

Over to You

That’s it. Try out these troubleshooting methods to fix USB Not Recognized issue. Well, if the issue remains unsolved, then there are chances that the problem is with the device itself. Replace or change the device once and try again.

However, if it's the USB port that’s creating the USB Device Not Recognized issue, then it is advisable to get the help of a hardware expert and get it resolved.

Sources:- geekdashboard

Hey My Readers and Visitirs If You Like Us or Our Web Site Please Share and Link back To My Site ... Take Care .,.,.


add

Related Posts Plugin for WordPress, Blogger...
 

Google Analystic

add block