Social Icons

twitter facebook google plus linkedin rss feed email


Monday, October 15, 2018

More New Windows 10 October 2018 Update Features (Version 1809)


We have shown you some of the best new features of Windows 10 October 2018 Update – the ones you will notice most. But there are several more subtle changes that also make the OS a better experience overall. Here is a look at some of the other new features in 1809 and you can expect after the update.

More Control Over Windows Updates and Restarts

Users have wanted better control over Windows update for years. In fact, the recent file deletion issue with the release of Windows 10 1809 is a good example of why you want to delay feature updates. Still, in 1809 Microsoft is making efforts to give Windows detect a better time of the day when you’re not working on your PC and forcing the update and restart. The predictive model is meant to learn when you’re away from the PC for hours versus just taking a 15-minute coffee break.
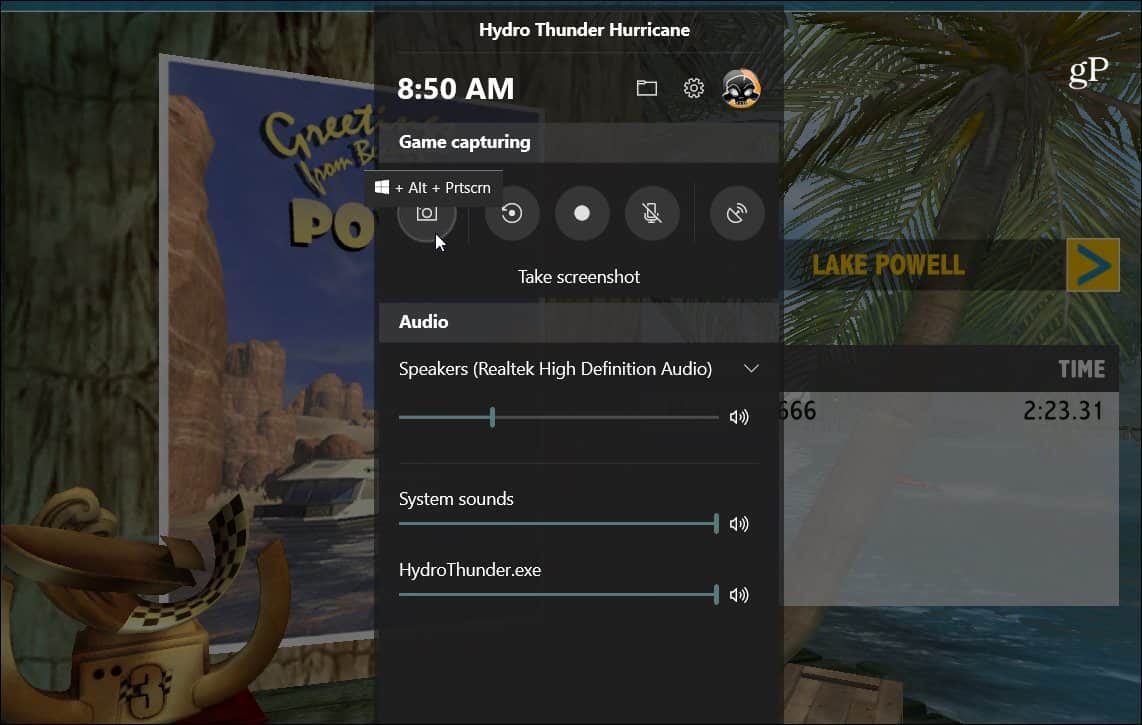
Gamebar Improved

If you are a gamer, you will enjoy the new additions to the Gamebar which now includes audio controls to change the output device and adjust volume levels of games and apps. Plus, the Gamebar now display frame rates, CPU usage, and other hardware stats.

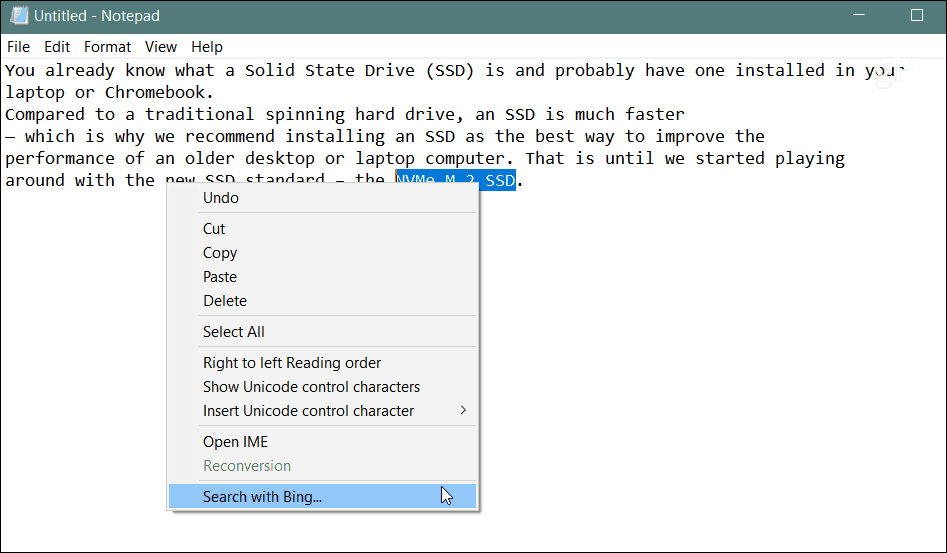
Notepad Improvements

Notepad now supports UNIX line endings, you can search for selected text with Bing, and can change text zoom levels. Whether you write code or use Notepad for, well, notes, there is something new for everyone. Speaking of the classic Windows app, check out our list of things you didn’t now Notepad could do.
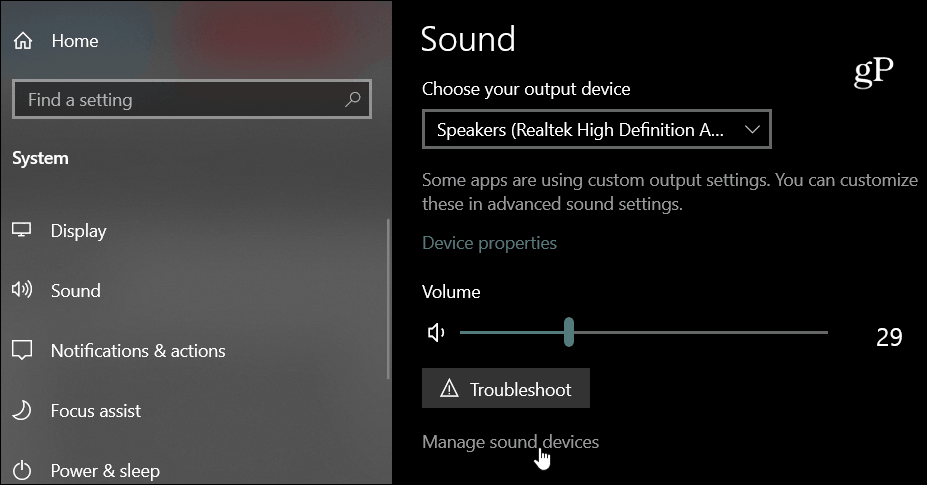
Sound

Microsoft added new Sound Settings in the last feature update – Windows 10 1803 and this time it has added a few more things. It now includes Device properties and now has the Manage sound devices link that brings you to a new page that lets you test and disable your speakers or mic. To find the improvements head to Settings > System > Sound.
Sound Devices Windows 10

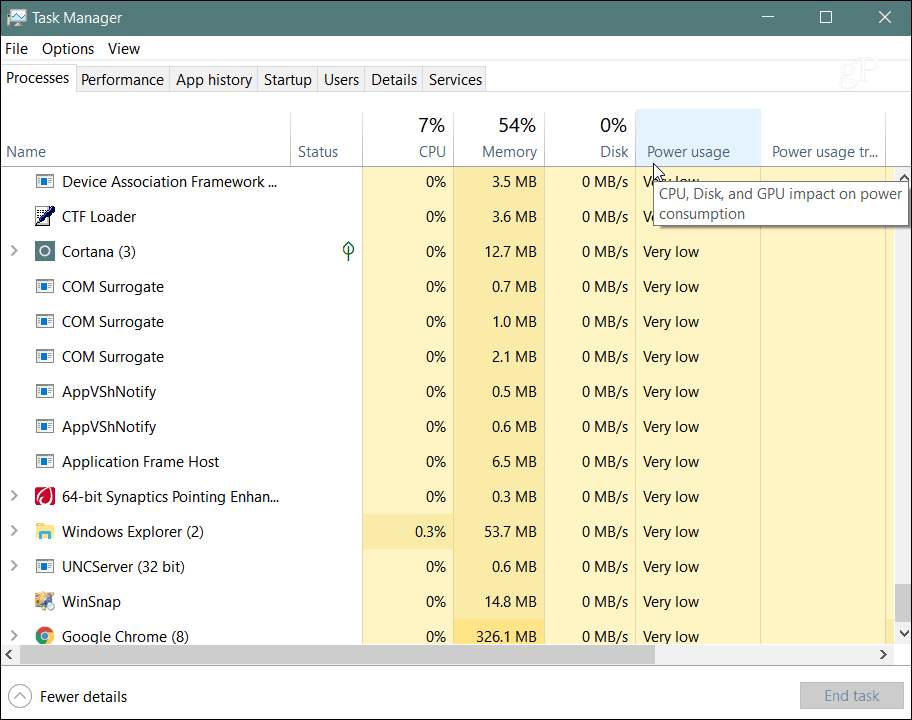
Task Manager Power Usage by App

There are a couple of new columns in Task Manager including “Power usage” and “Power usage trend” columns under the Processes tab. This allows you to view the power usage on a per-app basis. This will come in handy when trying to get the most power from your battery each day.

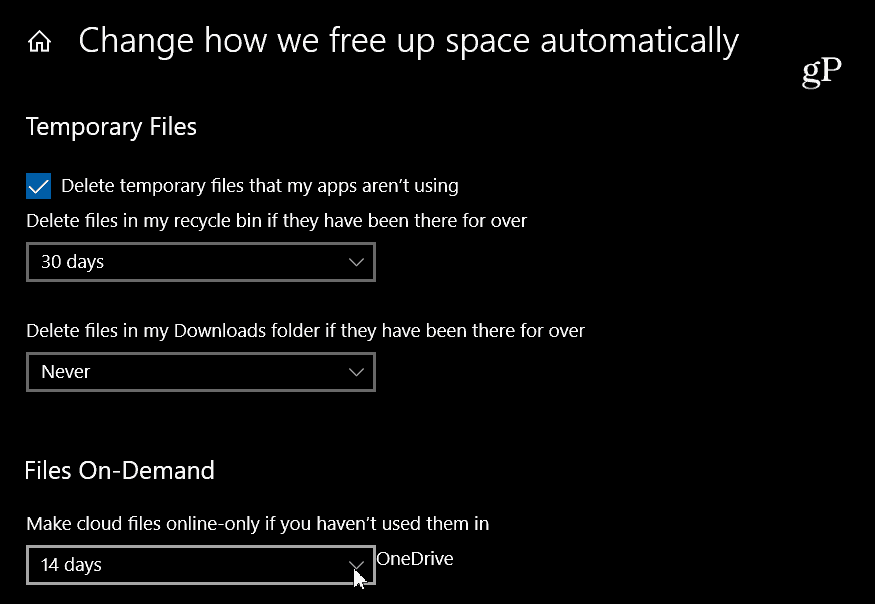
Make Files Store to One Drive for Online Access

A new feature in Storage Sense is the ability to make One Drive files on-demand only. This allows you to keep files you don’t regularly use save to Microsoft’s servers, and create more room on your local drive. For more on using the new feature, check out our article on how to make One Drive files online-only.
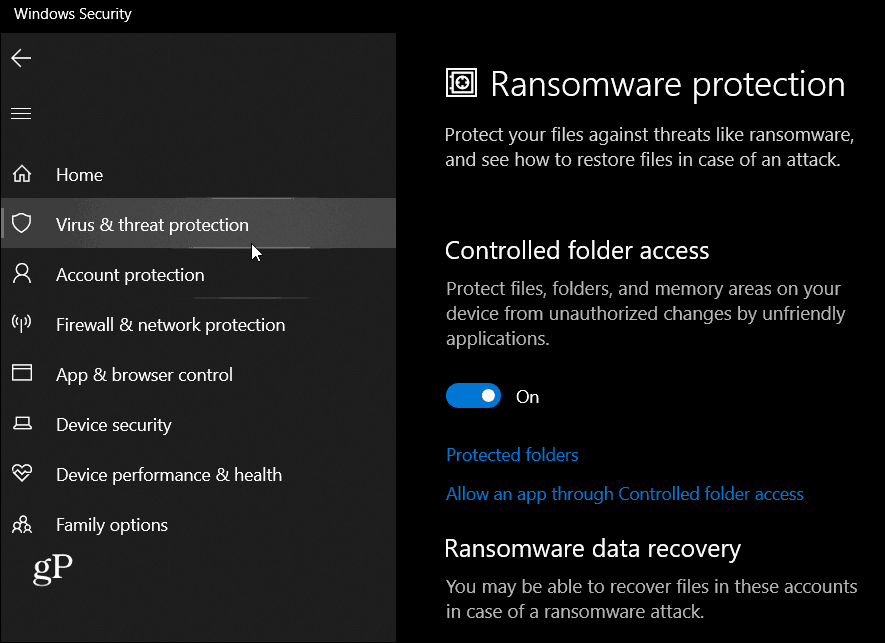
Security Improvements
While there aren’t any major new features with Windows 10 security, there are some changes to the UI as well as new Ransomware Protection. You can find ransomware protection is part of Controlled Folder Access which is like having a firewall for your folders with sensitive data. It is buried deep in security settings, though. The easiest way to get to it is hit the Windows Key and type: virus & threat protection and hit Enter. Then scroll down near the bottom of the page and click the Manage ransomware protection link. There you can manage which folders are protected and which apps you want to allow through.
Ransomware Protection Windows 10
Of course, there are many more changes and improvements that you’ll find as you start using 1809. And some new abilities you won’t notice at all (Mixed Reality features, for example). Also, some legacy features have been removed or deprecated. But overall, despite the initial launch hiccups, this is a solid overall update for Windows 10.

Hey My Readers and Visitirs If You Like Us or Our Web Site Please Share and Link back To My Site ... Take Care .,.,.


Friday, October 12, 2018

How to Recover an Unsaved Word Document


Few things incite the same level of panic and terror as realizing you closed or otherwise lost a Word document without saving it. While there's no guaranteed way to recover an unsaved Word document, there are several steps you can take to possibly salvage at least part of the file you so desperately need. 
The steps that might help you recoup your lost Word document depend on the version of Word you're using, and possibly the version of Windows you're using.

How to Recover a Document in Word 2016 and Word 2013 

For both Word 2016 and Word 2013, you have a few methods that may result in the recovery of your Word document. Each method can be executed quickly, enabling you to search for multiple files easily.
Using Word's Recover Unsaved Documents Feature:
  1. Start Word.
  2. Go to the File tab and select Manage Document.
  3. Select the Manage Document button.
    Manage Document in Word
     Manage Document can help you recover unsaved Word docs.
  4. Choose Recover Unsaved Documents from the drop-down list. The Open dialog box appears, showing you a list of unsaved Word documents that you can recover.
  5. Select the Word document you want to recover, then select Open. Save the recovered document right away.
Note: If that doesn't recover your missing Word file, continue attempting to find and save it.
Using Word to find a backup:
  1. Go to the File menu and select Open.
  2. Select Browse.
  3. Navigate to the location where you saved any version of the document.
  4. Look for a file with the name "Backup of" followed by the name of the missing file or search for files with the extension ".wbk." 
  5. Open any potential backup files you find.
Using Windows Explorer:
Press Windows key+E to open Windows Explorer if you are unable to locate the file.
Navigate to the following locations in Windows Explorer: 
  • C:\Users\<username>\AppData\Local\Microsoft\Word
  • C:\Users\<username>\AppData\Local\Temp
  • C:\Users\<username>\AppData\Roaming\Microsoft\Word
Look for any recovered or temp files that might be your lost Word document.

How to Recover a Document in Word 2010 and Word 2007

In Word 2010 and Word 2007, you can perform a search on your computer for the missing document:
Go to the Start menu, then type all or part of the file name into the search box and search for the file. Double-click any results in the File list.
To look for backup files from within Word:
  1. Start Word and select the File tab if you're using Word 2010; select the Microsoft Office Button if using Word 2007.
  2. Select All Files in the Files of Type list.
  3. Look for any backup files and select Open to see if one of them is the unsaved Word document you're trying to recover.
You can also perform a search on your computer for .wbk files, which are backup versions of Microsoft Word documents:
Go to the Start menu, then use the search box to search for ".wbk" files. Open any .wbk files that appear to determine which is the missing Word doc you need.
To “force” Word to look for AutoRecover files:
  1. Open Task Manager by right-clicking any blank spot on the taskbar and select Task Manager.
  2. Go to the Processes tab.
  3. Select any instance of Microsoft Word or Winword.exe.
  4. Repeat until all instances of Word are closed.
  5. Close Task Manager and start Word. The Document Recover pane will open if Word finds any AutoRecover files. Double-click a file in the pane to open it and be sure to save it to a safe location on your computer right away.
Search for temporary files, which can help if you downloaded a Word document from an email or the web:
Go to the Start menu and use the search box to search for .tmp files. Select Other on the Show Only toolbar, then look for any files that might be your missing document.
Tip: You can also search for ~ separately, as some temp files begin with the tilde character.

Prevent Future Disasters With AutoSave and AutoRecover

To save yourself the stress, worry, and time of trying to recover an unsaved Word document in the future, take steps now to keep it from happening again.
AutoSave in Word
 AutoSave and AutoRecover can prevent you from losing a Word document.
If you have an Office 365 subscription, you can use AutoSave to save changes to documents in real time. AutoSave is enabled whenever a file is saved to OneDrive or SharePoint. Every few seconds, Word automatically saves any changes to the cloud.
To make sure AutoSave is enabled, look for the AutoSave toggle button in the upper-left corner of your Microsoft Word window.
If you are not an Office 365 subscriber, you can enable AutoRecover to automatically save changes to a file in increments of time that you determine:
  1. Go to the File tab and select Options
  2. Select Save in the left pane of the Word Options box. 
  3. Select the Save AutoRecover Information Every X Minutes checkbox and enter a number in the Minutes box, such as 5 or 10. 
  4. Select the Keep the Last AutoRecovered Version if I Close Without Savingcheckbox as well. This will allow you to recover the most recently AutoRecovered version, which might not be the complete Word document but will likely be better than no document at all.
  5. You can also change the location of where your AutoRecover files are saved if you'd like them kept in another folder. Select the Browse button next to AutoRecover File Location and navigate to the place on your computer where you would like to save them.
  6. Select OK to save any changes you make in Word Options.

How to Recover a Document in Word Online

If you create documents using Word Online, you're in luck. You might notice there's no Save button; that's because any changes you make to a document are automatically saved.

How to Recover a Document in Word for Mac

By default, AutoRecover is enabled in Word for Mac. If your computer shuts down unexpectedly before you saved a Word document, you'll be prompted to open the recovered file. Otherwise, you can look for the file in the AutoRecover folder.
In Word for Mac 2016, you will first need to show hidden files. Once you've done this, you can search for the lost document.
Just open Finder, click the Home icon in the left column, then navigate to "Library/Containers/com.microsoft.Word/Data/Library/Preferences/AutoRecovery". Any documents saved by the AutoRecover feature will be listed here.
In Word for Mac 2011, you can check for the file from within Word:
  1. Choose File from the menu bar and click Open.
  2. Type "AutoRecover" in the search box.
  3. Double-click the most recently saved AutoRecover file.
  4. Click the file, then click Open. If the file is grayed-out, choose All Files in the Enable menu, then click the file.

How to Recover a Document Using Third-Party Applications


If you are unable to recover an unsaved Word document using any of these methods, you might consider trying a third-party application. However, Microsoft doesn't guarantee or offer support regarding the reliability or performance of any third-party utilities claiming to recover deleted or unsaved Word documents.

Hey My Readers and Visitirs If You Like Us or Our Web Site Please Share and Link back To My Site ... Take Care .,.,.


How to Send a Text From Your Computer


Texting goes hand-in-hand with smartphones, but there are times you might want to send a message or response from your computer. For one, it saves you from spending 20 or 30 minutes scrolling through pictures or social media when you just needed to send one quick message. It's also convenient if you have a longer message to send and you'd rather type it on a real keyboard.
Whatever the reason, texting from your computer is easier than ever to do, with multiple ways to do so, depending on the platform. Here are seven ways to text from your computer.

How to Text From Computer Using iMessage (iOS & MacOS)

Apple's iMessage service has long been the popular way to send messages between iPhones, and now you can also send them from your Mac computer. All you need is the Messages app on your iPhone and Mac, and an Apple ID. Be sure to sign in with same Apple ID you use with Messages on your iPhone and other devices. To use this feature, you'll need iOS 8 or later on your iPhone and OS X Yosemite or later on your Mac. It's also compatible with Apple Watches running watchOS 1.0 or later.
iPhone and Mac screen displaying Apple Messages.essage can use data or Wi-Fi to send and receive messages, so it doesn't count against your text messaging plan. You can forward text messages (such as those from Android users) from your iPhone and iPad to your Mac by going to Settings > Messages > Text Message Forwarding, then choosing which devices can send and receive text messages from your iPhone.

Send Text From Computer Using Android Messages (Android & Web Browsers)

You can send and receive text messages, photos, voice messages, and video using Android Messages on your smartphone and desktop. To link the mobile app and the web version:
  1. Open the Messages app on your smartphone, tap the More options menu(three vertical dots), then tap Messages for web. Android Messages count toward your texting plan; the app doesn't use data, and the recipient doesn't need to have the app.
    Android Messages smartphone set-up screen.
  2. Visit https://messages.android.com on your computer using one of the following browsers: Chrome, Mozilla Firefox, Safari, or Microsoft Edge. Internet Explorer isn't supported.
  3. On your Android smartphone, tap Scan QR code and point it at the QR code displayed on the computer.
  4. Enable Remember this computer beneath the QR code if you're using a trusted device, so you only have to do this once. Then you can opt into desktop notifications if you want, and you'll see your text history on the page.

Sync Text Messages Using Pushbullet (Android, iOS & Web Browsers)

Pushbullet syncs your texts between your smartphone, web browser, and desktop PC; it also lets you share websites and images from your smartphone to your computer (or multiple computers) and vice versa. There are Pushbullet apps for Android, iOS, and Windows PCs. Pushbullet also works with Chrome, Firefox, and Opera browsers.
  1. Install the mobile app on your phone and the desktop app on your computer.
  2. Sign into each app with your Google or Facebook account to link them together, and you'll start seeing text notifications pop up on your desktop that you can respond to; you can initiate texts, too.
    Pushbullet set-up screen
  3. To test if the notifications are working, go to Settings in the mobile Android app and tap Send test notification. It should show up on both your phone and computer and dismissing the alert on either device should also dismiss it from the other.

Send a Text Using Cortana (Android & Windows 10)

Android users with Windows 10 PCs can also text from their computer:
Launch the Cortana app on your Android smartphone. Tap the hamburger menu, then go to Settings Sync notifications. Enable Missed call notificationsIncoming message notifications, and App notifications sync.
On your Windows 10 PC:
  1. First, go into Settings and toggle on Send notifications between devices. Optionally, you can also enable Use Cortana Even When My Device is Locked.
  2. Enable Cortana by selecting inside the search box in the Taskbar, then select the Notebook icon. You're now in Cortana's settings.
  3. Next, select the Settings icon and toggle on Hey Cortana. Now you're ready to text from your computer.
  4. Activate Cortana by saying "Hey Cortana" and say, for example, "Text Henry" or type SMS Henry, then speak or type your message, and state or select Send.
  5. You'll get a desktop notification when you receive a text, and you can type your reply in the notification window.

Send Texts Using Google Voice (Cross-Platform)

You can also send texts using Google Voice to U.S. and Canadian numbers for free.
  1. On your smartphone or PC, go to your account page and select the messages icon on the left. Here's where you'll also see your text history.
  2. Select Send a message to create a new one, or select a conversation to continue a thread.
    The texts will show up as sent from your Google Voice number.
  3. That's it.
The Google Voice interface looks very similar to Google Hangouts; in fact, you can link Hangouts to the Voice account:
  1. First, make sure you're signed into each service using the same username and email address.
  2. Go to hangouts.google.com, then go to Menu Settings.
  3. In the Google Voice section, check Receive SMS and voicemail in Hangouts.
    When you receive texts in Hangouts, they're labeled SMS via Google Voice.
  4. You're done!
You can also open Hangouts in Gmail. At the top of your Hangouts list, select the Down arrow next to your name and profile photo, then scroll to the bottom of the Settings screen and check the box next to Receive SMS and voicemail in Hangouts.

Email a Text

Another method, albeit clunkier compared to the others in this article, is to send a text message via email. Each wireless carrier has an email formula for doing so. For example, to send a text message (SMS) to an AT&T user, email "number@txt.att.net," but replace "number" with a 10-digit phone number. To send an MMS (multimedia message, such as a photo) email "number@mms.att.net." Check with the carrier or reference this list of carrier email addresses.
The issue here is the email could end up in the recipients' spam folder or get lost in the shuffle since it will look differently from standard email addresses. You must also know which carrier the recipient uses.

Text From Computer Using SMS Websites

Finally, there are SMS websites that let you send text messages anonymously.
Some of these websites collect the numbers that users input and sell them to third parties. This method is best reserved as a last resort when anonymity is critical.

Hey My Readers and Visitirs If You Like Us or Our Web Site Please Share and Link back To My Site ... Take Care .,.,.


add

Related Posts Plugin for WordPress, Blogger...
 

Google Analystic

add block