Social Icons

twitter facebook google plus linkedin rss feed email


Showing posts with label Tablet. Show all posts

Friday, July 14, 2017

Google Assistant: 5 killer new features you should be using

Google has had voice search features in Android for years, but when Google Assistant rolled out on the Pixel in October 2016, everything finally came together. You can now get Assistant on plenty of Android devices, and Google just improved the platform with a raft of new features in recent weeks.
It can be easy to miss the improvements if you don’t obsessively keep an eye on the news, so here they are in one place: the five coolest new features in Google Assistant.
Explore menu
Google used to hide all of Assistant’s features in a series of esoteric, buried menus. Now, there’s a much more sensible way to find out what sort of cool things you can do with Assistant in the Explore menu. 
google assistant explore
IDG
To access this menu, open Assistant and tap the blue drawer icon in the upper right corner. Here, you can find all the services supported by Assistant broken down into categories like Social & Communication, Education & Reference, Games & Fun, and more. Each tile links to a full info page where you can see sample commands and (if necessary) link your account. Bottom line: Checking out the Explore menu is the easiest way to keep track of newly added apps and services.

There are also some general Assistant command suggestion at the top. You don’t even have to speak the suggestions, just tap the bubble and they’ll be dropped right into Assistant.
Typing to Assistant
Google Assistant first appeared in the Allo app, and in that iteration, you could input text to “chat” with the Google’s bot. But the more powerful baked-in phone version of Assistant began its life with only voice input. That’s fine when you’re in a situation where you can talk to your phone, but voice dictation isn’t always appropriate. Well, thanks to the recent update, you can now type your questions and commands, too.
google assistant typing
IDG
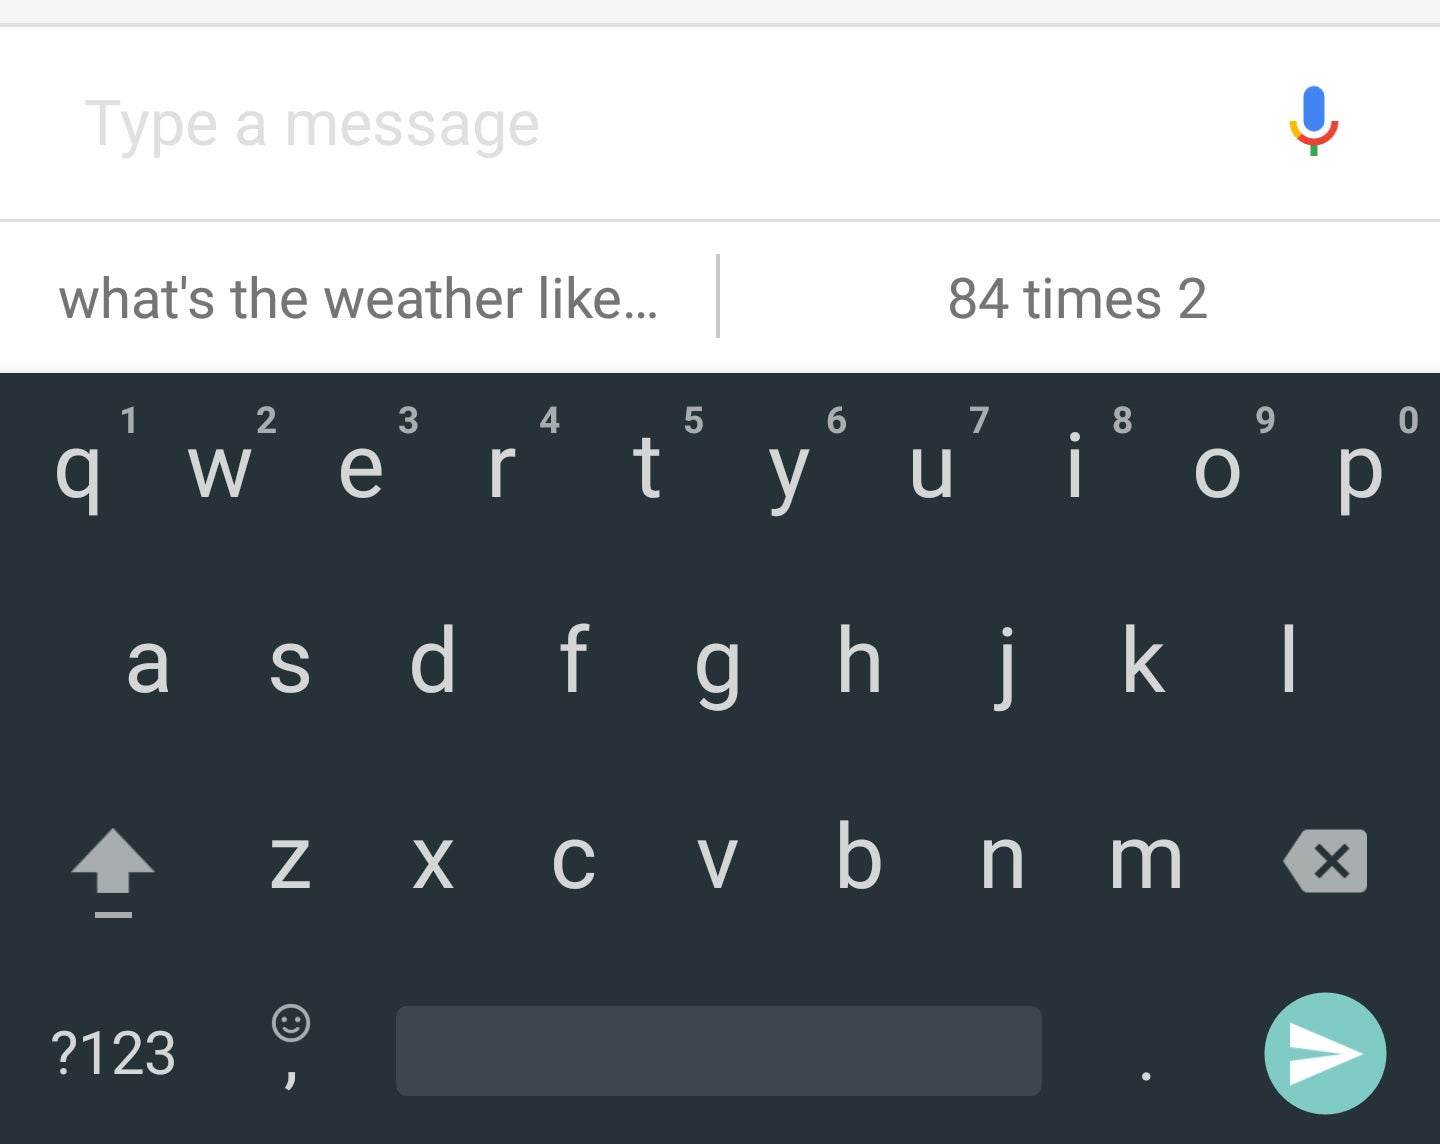
To access the keyboard in Assistant, just long-press your home button as you normally would. But instead of speaking right away, tap the keyboard icon in the lower-left corner. Assistant will expand to fill the screen, and you can begin typing. Assistant will respond to all the same commands that you’d use in a voice-dictation situation, and you’ll also find contextual suggestions above the keyboard. And because these suggestions are part of Assistant, they appear no matter which keyboard app you’re using.

Editable history

Google Assistant used to be a transient experience—whatever you said to Assistant would be lost to the ether as soon as you left the Assistant UI. But now there’s a full history of your commands, and you can edit them too.
google assistant editing
IDG
To access your Assistant history, you need only drag up on the overlay when Assistant pops up. This will drop you into a full-screen interface that shows your recent queries. Scroll up to see everything you’ve asked and how Assistant answered.
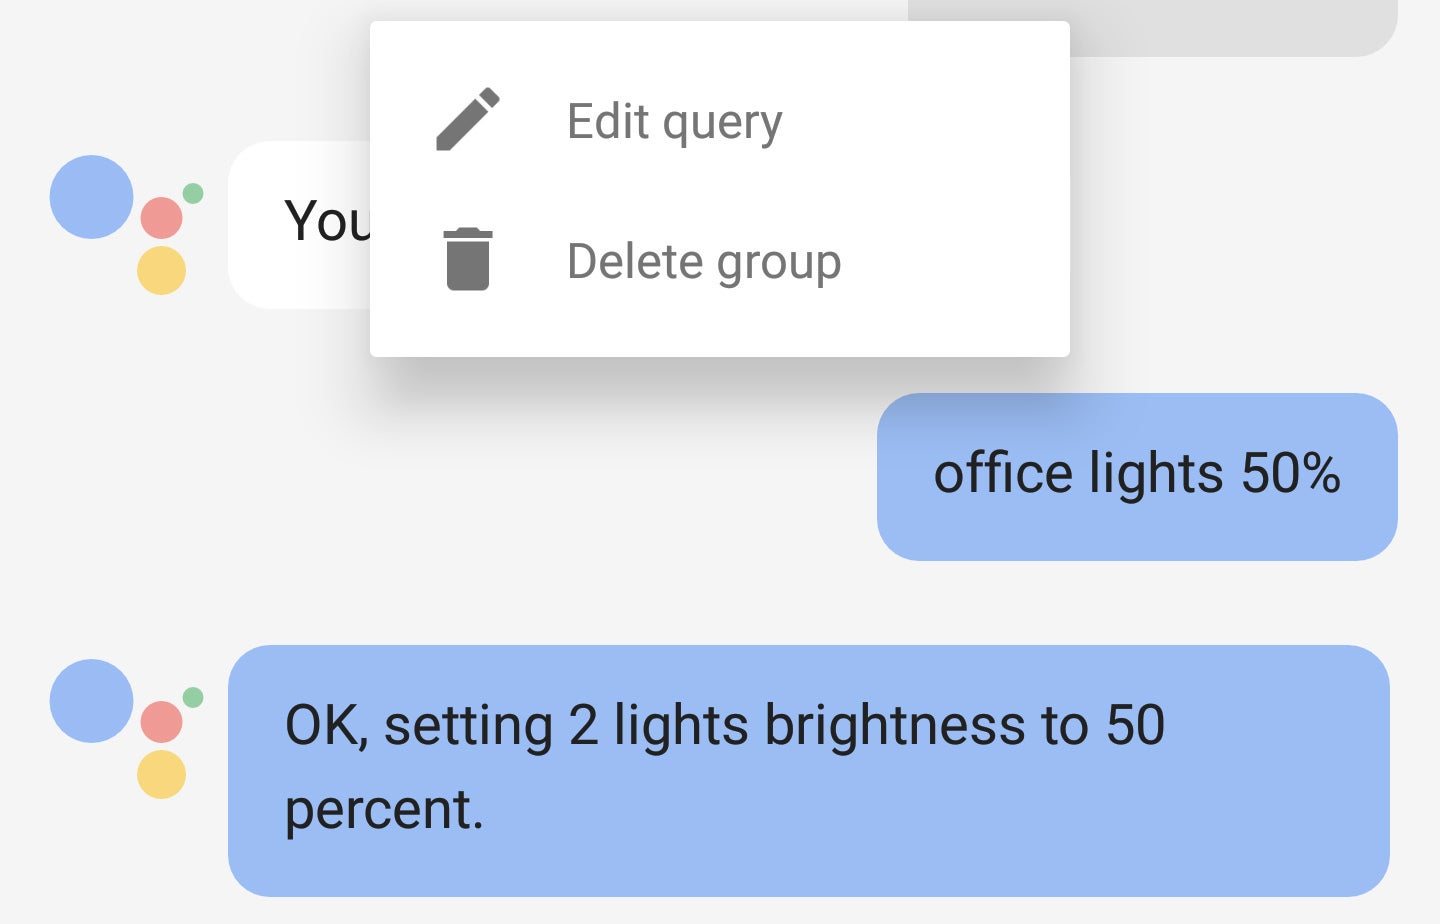
Editing is a snap, too. Long-press on a query, and it will be highlighted along with Assistant’s reply. From there, you can either delete or edit it. Deleting will completely remove the query (and associated activity) from the history. This is just like removing something from your Google search history, so it won’t be used to inform future search and Assistant predictions.
If you choose to edit a query, the query will be dropped into the text field along with an open keyboard. You can tap send to immediately repeat the command, or make some changes and send it again. Just note that none of this undoes the actions performed when the command was first issued. 

Shortcuts

There are dozens of services and apps integrated with Assistant already, but some of them get preferential treatment. For example, you can tell Google to control your Hue lights directly, but lights connected through Homey require you to preface all commands with “Tell Homey.” It can get a bit tedious, but shortcuts are here to help.
google assistant shortcuts
IDG
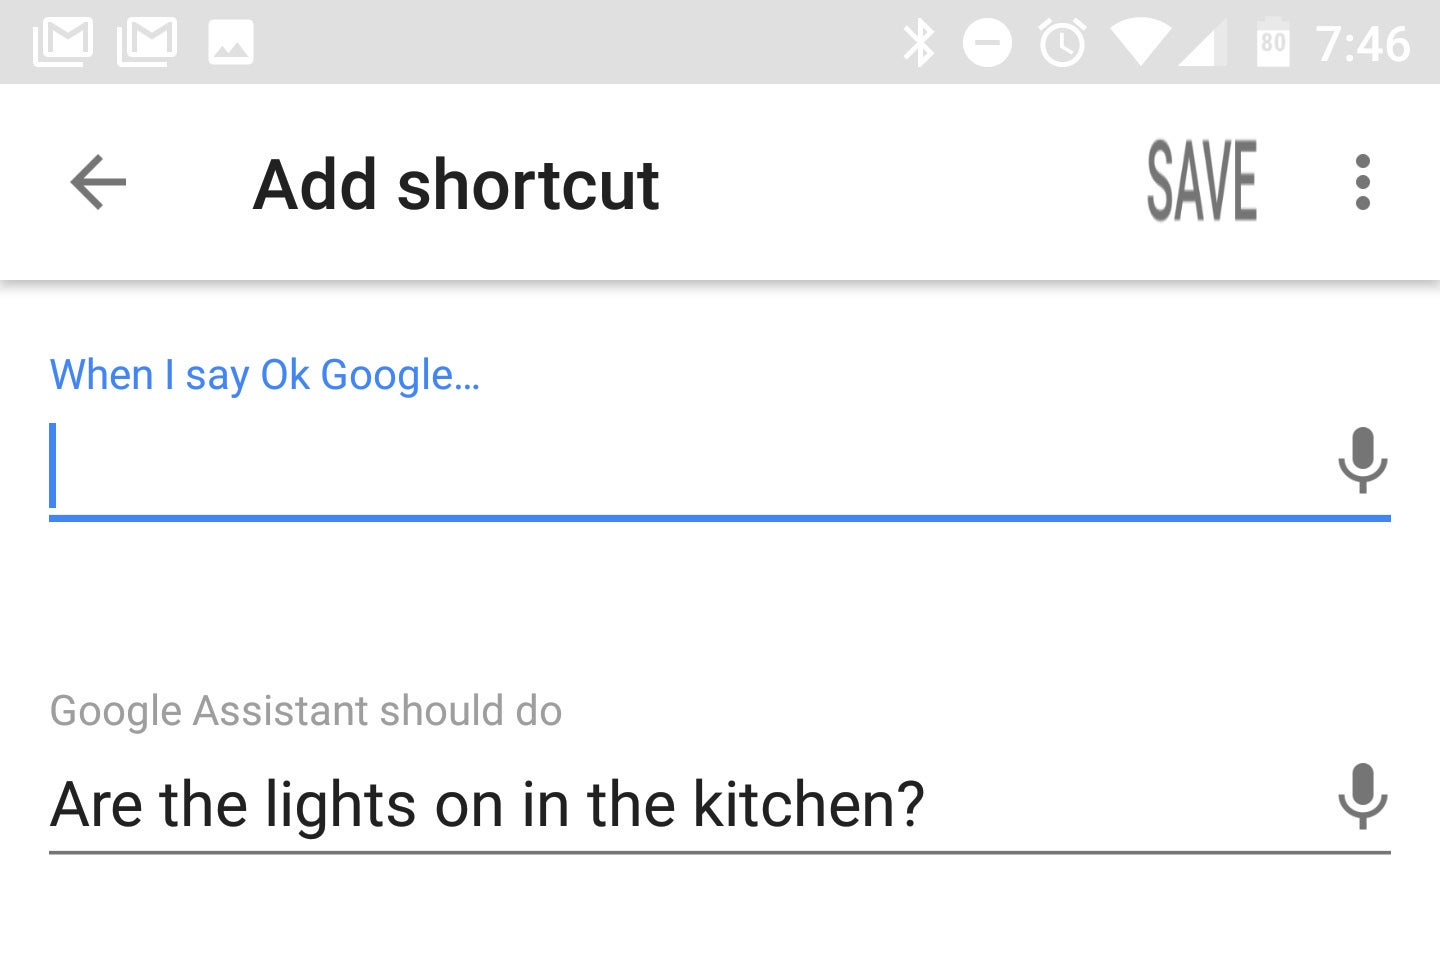
To create a shortcut, find the service you want to have quicker access to in the Explore tab. There will be an option on the info page to add a new shortcut. The shortcut screen has a box for what you want to say, and one below that for what you want Assistant to actually do in response.
In the top box, input whatever snappy shortcut phrase you want. It tends to work better if you use the microphone button to speak the shortcut. Assistant will sometimes put a sample command in the bottom box, but you can change that to the command you want. It has to be the full phrase you’d say to Assistant, including the “Tell [X]” part if needed. Once your shortcut is saved, it’ll work by voice and text.

Google Express shopping list

Google Assistant has always been able to add items to a shopping list, but that list used to live solely in Google Keep. As such, it was just a list. But Google recently changed the shopping list functionality to plug directly into its Google Express delivery service, which could be very useful if you use it.
google assistant shopping
IDG
All you have to do is say, “Add [item name] to my shopping list.” It will show up in your Google Express shopping list instantly. You can access that list in the Google Express app, or simply say “Show me my shopping list.” That takes you to the online version of your list, which can be shared with any of your contacts. If you’re a Google Express subscriber, you can tap “Shop your list” to get filtered search results from supported local retailers. Add items to your cart, and you’re done.
Assistant has existed for less than a year, but already it’s learning new tricks and becoming more useful. You should give these new features a shot if you wrote off Assistant when it launched last year.

Hey My Readers and Visitirs If You Like Us or Our Web Site Please Share and Link back To My Site ... Take Care .,.,.


Thursday, June 15, 2017

How To Share Ethernet Connection Over Wi-Fi In Windows 10


Have you connected your Windows 10 PC to the internet with an Ethernet connection and now want to share the Ethernet connection over Wi-Fi with your other devices? In this guide, we will see how to share your Ethernet connection over Wi-Fi in Windows 10.
Using a wireless router is perhaps the best way out there to share your Ethernet connection with other devices. However, if you don’t want to invest in a wireless router or don’t need to share your Ethernet connection very often, you can use the built-in mobile hotspot feature in Windows 10 to share your Ethernet connection over Wi-Fi with other devices.
Windows 10 allows you connect up to 8 devices to the mobile hotspot. The best thing is that you can set a password for the mobile hotspot as well.

Share your Ethernet connection over Wi-Fi on Windows 10 PC

Your Ethernet connection can be shared by following given below directions.
IMPORTANT: To share your Ethernet connection over Wi-Fi, you need to make sure that your Windows 10 PC is connected to the internet with an Ethernet cable.
Step 1: First of all, Open the Settings app. Navigate to Network & Internet > Mobile Hotspot.
Step 2: Under Mobile Hotspot, turn on the Share with Internet connection with other devices option.
Step 3: In Share my Internet connection from drop-down box, make sure that the Ethernet connection is selected. If Wi-Fi is selected, please connect your PC to the Ethernet connection.

As soon as you connect a working Ethernet connection to PC, Windows 10 will automatically select it. In case it doesn’t, choose Ethernet connection.
Step 4: By default, Windows 10 assigns a name and password for the mobile hotspot network or shared connection. The page also displays the number of devices connected to the shared network. Windows 10 currently allows you connect up to a maximum of 8 devices to the shared network.
To change mobile hotspot network name or password or both, click the Edit button and set a new name or password, or both.
NOTE: We recommend you turn off Allow another device to turn on mobile hotspot option to avoid someone turning on the mobile hotspot feature and use your PC’s internet connection (although it requires a paired Bluetooth phone/device). The option appears only when the mobile hotspot is turned off. So, turn this option off before turning on mobile hotspot.

SOURCES:- INTOWINDOWS

Hey My Readers and Visitirs If You Like Us or Our Web Site Please Share and Link back To My Site ... Take Care .,.,.


How to Get the Most Out of Google Maps


Google Maps is hand-down one of the best navigation apps on Android and iPhone, but considering most of us use it while driving, it’s easy to miss some of its features. Whether you’re new to Google Maps or a veteran, let’s take a look at the best ways to get the most out of it.

Save Your Home and Work Addresses

First things first, adding in your home and work address makes using Google Maps a little more pleasant, because it simplifies navigating to either place. Tap the three-line menu bar in the search box, then Your Places, and add your home and work address.

Add Multiple Destinations to a Trip


Need to snag some lunch on a long road trip? Or stop off at the pharmacy on your way home from work? Setting up multiple destinations makes that easy, though it’s easy to miss that it’s even an option. You have two different ways to add multiple stops.
First, map out directions to your final destination like you always do. Then, tap the three-dot icon in the top right corner > Add Stop. Enter a second location and Maps will navigate you between them. You can add up to nine different stops here.
Alternately, you can add a stop along your route midway through a drive. This makes the most sense for something like snagging lunch on a road trip or if you’re walking around a city in need of a quick cup of coffee. Go ahead and start up navigation to your final destination. Once Maps is navigating, tap the big search button, then search for whatever you need. Maps will only show you options along your current route.

Save Your Parking Spot

In the most recent version of Google Maps, you can have Google save your parking spot. When you park, you’ll see a pop-up that asks you to save your location. Do so and you can then add additional info, like what lot you’re in or how much time is on your meter. This feature is brand new, so if you don’t see it right now keep an eye out for it over the coming weeks.

Use Maps to Save Locations You’re Interested In


Depending on how you use Google Maps, you have a couple of handy ways to save locations. Historically, My Maps, was always the go-to, but that requires that you have access to a desktop computer. Head to the My Maps site on your computer, and you can create a private or public map that’s accessible in Google Maps on your phone. This is handy if you’re trying to create an itinerary for a vacation, planning out an event, or you’re working on a collaborative map with friends.

Perhaps more useful when you’re on the go is a new lists feature. Search for a location in Google Maps, then tap the Save button. Here, you’ll find a list of your places, included pre-defined lists called Favorites, Want to Go, and Starred Places. You’ll also see an option to add that location to a custom list or to create a new list entirely.
I’ve found these lists helpful for both planning vacations and keeping track of things I want to do when I’m home. They also come in handy when you have family in town and desperately need to find a good restaurant you’ve been to nearby. You can also share these lists or make them public. This means that even if you don’t do the legwork to plan a vacation, you can reap the rewards of someone more organized than you.

Look at Your History to See Every Trip You’ve Taken

By default, Google Maps keeps a running history of every trip you’ve taken. This is either very cool and useful or very creepy.
Tap the three line menu button, then Settings > Map History. Here, you’ll see all the different places you’ve navigated to. If you don’t like that Google Maps does this, you can disable it by flipping the toggle at the top of the screen to Off. I personally don’t see any use in keeping a history because I’m not an amnesiac in a Christopher Nolan movie, but you might find it useful yourself.

Use the Explore Button to Find Interesting Places Around You


If you’re in a new place and have no idea where to start, the Explore button is incredibly useful. Tap the three-line menu button, then Explore. You’ll see a list of food options, cafes, and bars. I ignored this little feature for a long time, but ever since I accidentally tapped it one time I use it pretty frequently. 

Download Maps for Offline Viewing

If you have a bad data plan with your phone or you’re traveling internationally, offline maps are a must. Search for a city or place name, then tap the name or address on the bottom bar. Tap the Download button to save that map. You can see what you’ve saved by tapping the three line menu button in the search bar, then tapping Offline Areas. In most cases, you can still navigate and search for destinations in this mode.

Zoom One-Handed

If you’re walking around with your phone trying to navigate with Google Maps, pinching to zoom is tough. Instead, double-tap on the screen, then drag your finger up and down. This zooms in and out on the map.

Send Directions from Your Computer to Your Phone

If you’re looking at directions to a place on your computer and want to do the actual navigation on your phone, you can send that data to your phone as long as you’re logged into your Google account on both devices.
First, search for a destination and find a route. Once you do, you’ll see an option to send the directions to your phone (or car, if it supports Google Maps).

Dig Deeper Into Transit Directions


If you use public transit, Google Maps is a fantastic way to get around and Google does a pretty good job of providing you with a lot of search parameters to fine tune your search results.
Search for a destination in Google Maps, then tap the public transportation button. Here, you’ll see a list of the various ways to get to your destination. If you need to change the time around, tap the Depart at button and change that to whatever option you need. You can also tap the options button to fine-tune your results, including which forms of public transportation you want to use (or not use), and change how much walking you to do.

The Last Transit Mode You Used Will Always Be the Default

If you use a lot of different modes of transportation and bounce between different styles of directions, then you might have noticed that Google saves the your last used mode as the default. So, if you got walking directions last time, you’ll get walking directions in your next search. You can always change modes by tapping the big transit mode icon on the search results and then picking the mode you want from the options bar.

Avoid Highways, Tolls, and Other Options

Sometimes, you don’t want to deal with highway driving. On those days, it’s nice to force Google Maps to steer clear of highways. Enter in your destination, then tap the three dot icon in the top right. Tap the Route options button. Here, you can choose to avoid highways, tolls, and ferries.
More importantly, you can also toggle whether Google Maps uses your options for every trip or just this one. If you want to always avoid highways, tolls, or ferries, set the Remember Settings toggle to on. If you want to do so for only this trip, set it to off. I prefer to leave it in the off position so I don’t accidentally get routed some weird way because I forgot to turn highways back on.

You wouldn’t think that something like guidance volume would matter, but if you’re driving around in a car with weird speakers, it’s nice that Google gives you a lot of options.
Tap the three line icon in the search bar, then Settings > Navigation Settings. Here, you can set the volume to soft, normal, or loud. You can also choose whether the voice navigation plays over Bluetooth or not. You can even mute navigation completely, or choose the “Alerts Only” function so you’re only alerted to traffic, construction, or accident alerts.

Hey My Readers and Visitirs If You Like Us or Our Web Site Please Share and Link back To My Site ... Take Care .,.,.


Tuesday, May 30, 2017

How to Connect Your Android Smartphone/Tablet to Your TV


Do you want to cast your Android display to your big screen TV? When we consider how much our smartphone or tablet can do, it doesn't make sense to rely on a "smart" TV or a streaming box like a Roku or Amazon Fire Stick. We already have the same access to Netflix, Hulu and other great providers in our pocket. So how do you get that screen from your smartphone or tablet to your TV?
It's a question that is both simple and complex.
Solutions like Chromecast make it relatively easy to 'cast' your screen, and depending on your particular smartphone or tablet, you may have a few wired options to explore as well.

Connect Android to Your HDTV With a Micro HDMI to HDMI Cable

The cheapest, easiest and perhaps best way to connect your Android device to your HDTV is with an HDMI cable. Unfortunately, it isn't as popular for manufacturer's to include a Micro HDMI port in their deice as it was just a few years ago.  But if you are lucky enough to have one, it make the entire epxerience much easier. Micro HDMI to HDMI cables are roughly the same cost as a regular HDMI cable, so you can get one for as cheap as $20 or less. You can find them in local electronics stores like Best Buy, Frys, etc.
Once you have your device plugged into one of your TV's HDMI inputs, all you need do is switch the TV's source (usually through a source button on the remote) to the HDMI port and you are good to go.
However, it is best to make sure the Android device is in landscape mode. While Apple has stuck with the 4:3 aspect ratio with the iPad —which is great for browsing the web, Facebook and the "computer side of tablets—most Android tablets sport a 16:9 aspect ratio that looks great on those big HDTV screens.
The big disadvantage to going with a 'wired' solution is the difficulty in using the device while you have it connected to the TV. If you are watching a movie, this isn't a big deal, but if you want to play a game or watch YouTube videos, it isn't ideal.

Go Wireless With a Google Chromecast

Google's Chromecast is the perfect choice for anyone wanting to hold their tablet or smartphone in their hand while projecting the screen to their TV. It also happens to be the cheapest choice for those who don't have a Micro HDMI port on their device. But don't mistake it for similar streaming devices like Roku, Apple TV or Amazon Fire TV. The Chromecast dongle doesn't actually do anything on its own. It relies on your Android device to be the brains behind the operation, while it simply takes your Android screen and 'casts' it onto your television set.
The biggest advantage of Chromecast is the price tag, which comes in at under $40. Another really cool feature is the compatibility with both Android and iOS devices. While you can only do true display mirroring with an Android smartphone or tablet, you can still 'cast' video from Netflix, Hulu or any other Chromecast compatible app from your iPhone or iPad.
This is great for households that have both major mobile platforms.
And Chromecast set up is a lot easier than you might think. After plugging the dongle into your TV and attaching the power cable, you simply download and launch the Google Home app. This app will detect the Chromecast and establish a connection to help set it up. It can even transfer over your Wi-Fi information device automatically on some devices. Google Home is also the app you use to mirror your display, although with many popular apps like YouTube, you simply need to tap the 'cast' icon, which looks like a box or TV with the Wi-Fi symbol in the corner.

Connect to Your TV Using MHL 

All is not lost if you don't have a Micro HDMI port on your device. MHL, which stands for Mobile High Definition Link, is basically a fancy way of saying Micro-USB to HDMI adapter. Many of the top brands support MHL for their Android smartphones and tablets, although you may need to double check your own device. Here's a list of all mobile devices that support MHL.
This connection gives you the same benefits as connecting through a Micro HDMI port, but it is slightly more expensive because of the need for the MHL adapter, which can cost between $15 and $40. When you combine this with the cost of an HDMI cable, this option can be more expensive than a Chromecast.
Like the Micro HDMI to HDMI solution, this just works. You shouldn't need to do anything special other than make sure your smartphone or tablet is in landscape mode to get the best viewing experience.
A warning for Samsung owners: Samsung has dropped support for MHL and all other protocols for sending video and audio over USB, so if you have a newer Samsung device like the Galaxy S6 or Galaxy S6 Edge, you will need to go with a wireless solution like the Chromecast.

Connect to Your HDTV Using SlimPort

SlimPort is a new technology designed for all sorts of devices from smartphones to tablets to cameras. It uses the same basic technology as DisplayPort to pass audio and video to a television or monitor. It has growing support that includes devices like the LG V20, Acer Chromebook R13, HTC 10, LG G Pad II and Amazon Fire HD tablets. You can check this list if to see if your device has a SlimPort.  
SlimPort operates much the same as MHL. You will need a SlimPort adapter that costs between $15 and $40 and you will need an HDMI cable. Once you have the adapter and cable, setup is rather easy.

Connect Your Android Device With Roku or Other Wireless Solutions

Chromecast isn't the only game in town when it comes to wireless, although it may be the cheapest and easiest solution. The Roku 2 and newer boxes by Roku support casting. You can find the screen mirroring option in the settings of the Roku. On the Android device, open the settings app, go to Display and choose Cast to see available options for casting the screen. Both devices will need to be on the same network.
A few third-party brands like the Belkin Miracast Video Adapter and the ScreenBeam Mini2 also support casting your mobile screen to your TV. However, with price tags that easily exceed the Chromecast, it's hard to recommend these solutions. The Roku can be a good choice for those who want a Roku or similar streaming device without the need to always connect your smartphone or tablet, but with the option of doing so.

Connect Your Samsung Smartphone/Tablet With Your Samsung HDTV

While it is unlikely anyone would be willing to buy a new television just because it supports mirroring an Android's screen, if you have a Samsung smartphone or table and you bought a Samsung television in the last few years, you may want to check if it supports casting. Unfortunately, this only works for Samsung-to-Samsung.
You can check if your TV supports the feature by going into the Menu, choosing Network and searching for Screen Mirroring. On your smartphone or tablet, you can pull down the extended notifications using two fingers to swipe from the very top edge of the display downwards. You will see a "Screen Mirroring" or "Smart View" option if your device supports it.  

Confused? Go With the Chromecast

It's easy to get confused when there are so many options that depend on the specific features of your device. If you are unsure of which ports are on your smartphone or tablet, the easy choice is to go with a Google Chromecast. And in most cases, this is also the least expensive option.
Chromecast will allow you to both 'cast' video from most of your favorite streaming apps and completely mirror your display for apps that don't support casting. It's also relatively easy to set up, and because it works wirelessly, you can have your device in your hands on the couch while you cast the screen to your TV.

SOURCES

Hey My Readers and Visitirs If You Like Us or Our Web Site Please Share and Link back To My Site ... Take Care .,.,.


add

Related Posts Plugin for WordPress, Blogger...
 

Google Analystic

add block